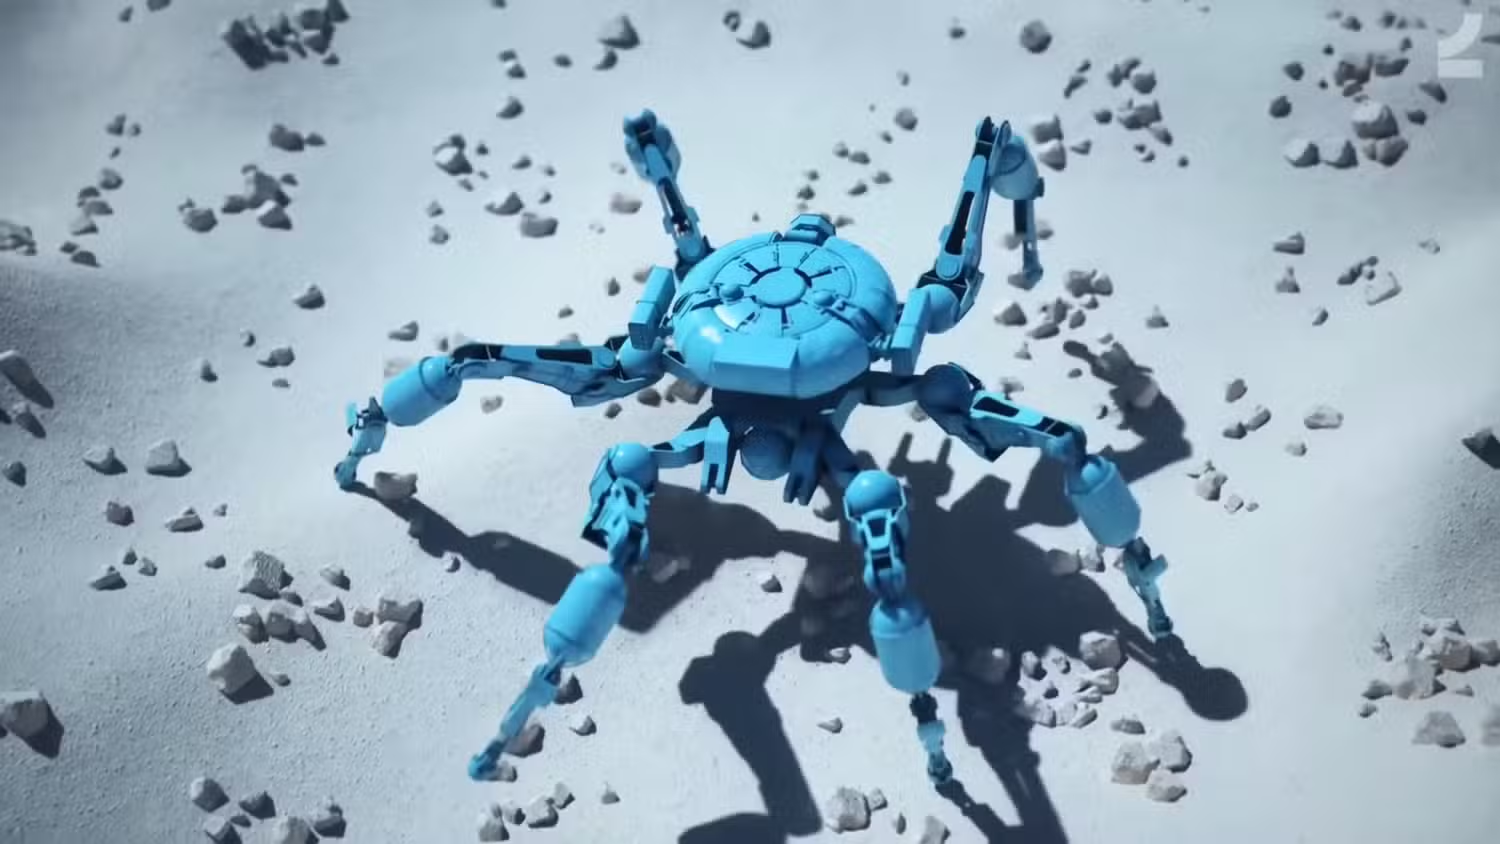
7. Learning Agents 기반 학습 입출력 구조 구축
- date
- 2월 23, 2026
- status
- Public
- tags
- unrealRL
1. 소개#
거미 로봇의 관절이 모두 정상적으로 접근하다는 것을 확인했으니, 이제 언리얼에서 지원하는 Learning Agent를 켜서 학습 루프까지 진입이 가능한 지 확인해보자
사용할 Learning Agent 요소는 크게 6개로 구성된다
1. BP_SpiderTrainingManager
2. BP_SpiderInteractor
3. BP_SpiderTrainingEnvironment
4. BP_SpiderPolicy
5. BP_SpiderCritic
6. BP_SpiderPPOTrainer
1.1. Agent 요소 소개#
1. BP_SpiderTrainingManager#
역할#
- 맵에 실제로 배치되는 훈련 총괄 액터
- 거미 로봇을 Agent로 등록
- 아래 5개 객체를 생성하고 서로 연결
- 최종적으로 훈련 시작을 호출
2. BP_SpiderInteractor#
역할#
Interactor는 거미와 학습기 사이의 입출력 어댑터
거미 현재 상태 → Observation
학습기가 낸 값 → Action → 거미 관절 제어
Interactor가 Observation과 Action을 통해 에이전트가 환경과 상호작용하는 방식을 정의
Observation#
- 몸체 Pitch / Roll
- 몸체 높이
- 관절 현재 각도
- 관절 각속도Action#
이걸 이미 만든 관절 제어 컴포넌트 쪽으로 연결해서 각 관절 목표 각도 값을 넣을 예정
3. BP_SpiderTrainingEnvironment#
역할#
학습에서 “잘했는지 / 실패했는지”를 판단하는 곳
Reward
Completion
Reset 조건Reward#
+ 몸을 세우고 버티면 보상
- 몸체가 심하게 기울면 패널티
- 넘어지면 큰 패널티
부터 시작해보기. 아직 걷기 보상까지 바로 넣지 말고,우선 “서 있는 로봇” 학습부터 시키는 방향
Completion#
- 넘어짐
- 몸체 높이가 너무 낮아짐
- 일정 시간 경과Reset#
- 거미 원래 위치로 복귀
- 관절 초기 각도로 복귀
- 물리 속도 초기화
4. BP_SpiderPolicy#
역할#
학습된 행동 네트워크
Observation 입력
→ Action 출력
즉, “이 상태에서 관절을 어떻게 움직일까?”를 담당하는 모델
공식 튜토리얼에서도 Interactor, Policy, Trainer를 핵심 구성으로 다룸
5. BP_SpiderCritic#
역할#
PPO 학습에서 사용하는 가치 평가 네트워크
쉽게 말하면
지금 상태가 앞으로 보상을 많이 받을 만한 상태인가?
를 추정해주는 보조 모델
PPO Trainer는 Policy와 Critic 둘 다 필요로 한다.
6. BP_SpiderPPOTrainer#
역할#
실제 강화학습 실행기
Manager
Interactor
Training Environment
Policy
Critic
을 받아서 PPO 학습을 시작
공식 Make PPOTrainer 노드 입력도 정확히 이 구성을 요구
1.2. 최종 연결 모양#
우리가 BP_SpiderTrainingManager의 BeginPlay에서 최종적으로 만들 그래프는 대략 이런 흐름이다
BeginPlay
  ↓
BP_SpiderRobot 찾기
  ↓
Add Agent

  ↓
Make Interactor
  ↓
Make Training Environment
  ↓
Make Policy
  ↓
Make Critic
  ↓
Make PPOTrainer
  ↓
Begin Training
2. 작업#
2.1. Learning Agent 세팅#
2.1.1.Learning Agents Manager 추가#
- 편집 → 플러그인 → Learning Agent 플러그인 켜고 재시작
- 컨텐츠 브라우저에 LearningAgents 폴더 생성
BP_SpiderActor
→ 실제 거미 로봇
→ 다리, 몸체, 관절 제어를 가짐

BP_SpiderTrainingManager
→ 학습 관리자
→ 거미 로봇을 “학습 대상”으로 등록하고
   Learning Agents 학습 전체를 관리함
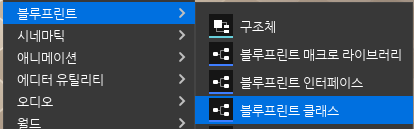
거미 로봇을 학습 대상으로 등록하고, 관찰값/행동값/보상/학습 실행을 관리하는 훈련 감독자를 등록해야 한다. 이를 위해 관리자 블루프린트 액터를 추가해보자(이름 : BP_SpiderTrainingManager)
이제
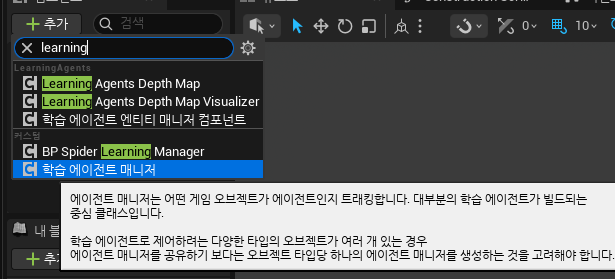
BP_SpiderTrainingManager안에 Learning Agents Manager 컴포넌트를 추가해보자액터 더블 클릭 → 컴포넌트 패널에서 추가 버튼 → Learning Agents Manager 추가
저장 후 컴파일
2.1.2. BeginPlay에서 거미 로봇 등록하기#
BP_SpiderTrainingManager를 레벨에 배치(드래그 앤 드랍)
더블클릭해서 이벤트 그래프로 들어가기
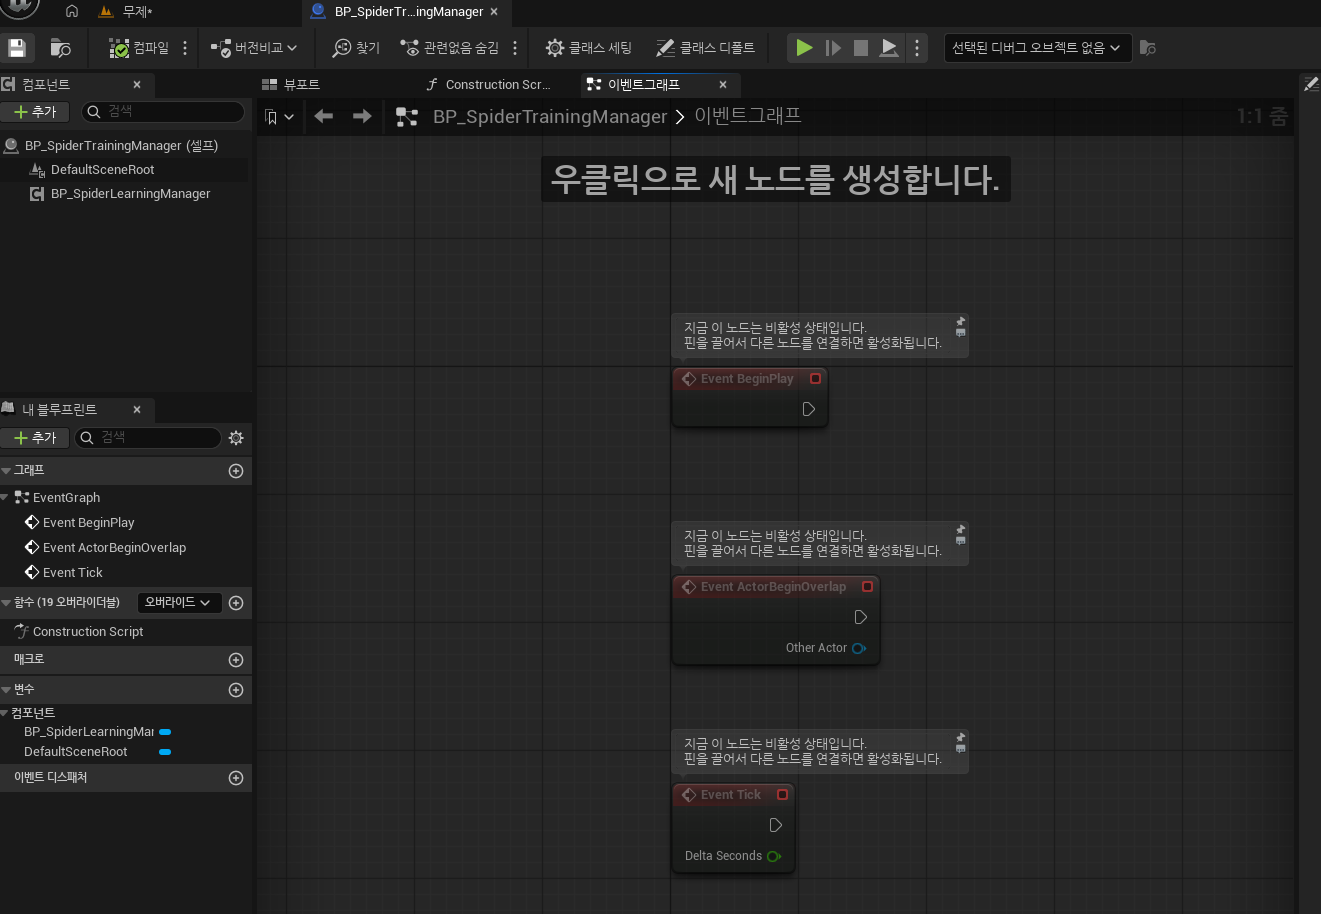
그래프 빈 공간에서 아래 순서대로 노드를 생성
2.2. Agent 블루프린트 세팅#
- Learning Agent 영상을 보면 금방금방 끝날 줄 알았건만, 직접 세팅해야 할 양이 엄청나게 많다.
2.2.1. [BP]Agent를 모델에 등록#
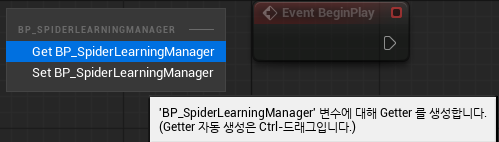
Event BeginPlay끌어오기- 매니저 컴포넌트 끌어오기→ 드래그 후 Get BP_SpiderLearningManager 선택
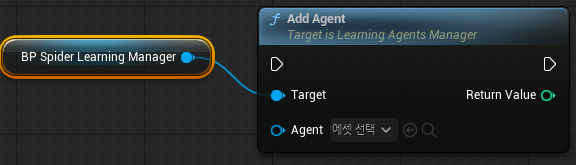
- 에이전트 매니저 → 에이전트 추가
Manager 컴포넌트에서
Add Agent를 호출해 학습 대상으로 쓸UObject를 등록
(Learning Agents (5.5) | Course)
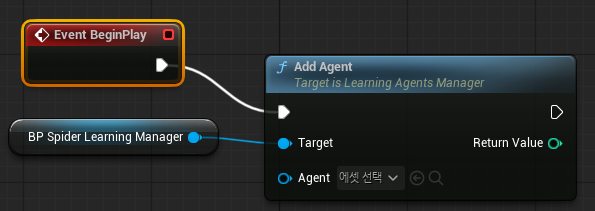
BeginPlay를Add Agent실행 핀에 연결
BeginPlay를 output 삼각형을Add Agent왼쪽 위의 실행 핀에 연결
Agent칸에 거미로봇 추가
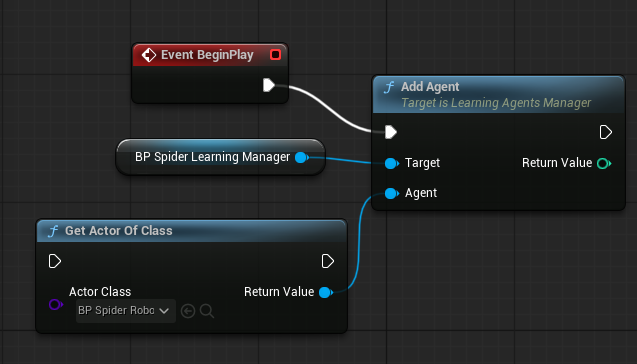
- 실행 흐름 정리
- 결국 클래스를 찾아야 학습하게 되어야하니깐 시작→로봇 클래스 찾기→Agent 추가 이 흐름으로 수정하자
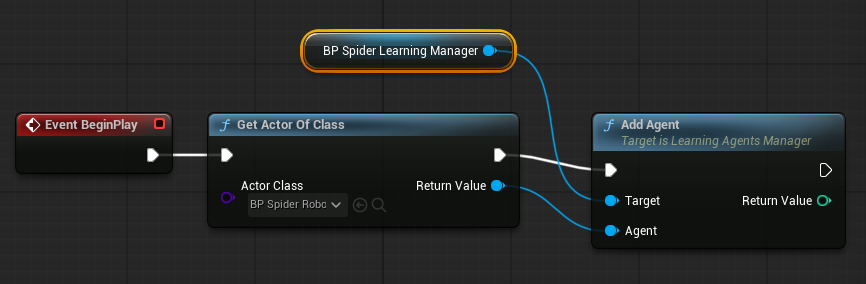
Learning Agents의 Manager는 등록된 오브젝트들을 Agent로 추적하고, Add Agent 노드로 학습 대상을 추가하는 구조.(Learning Agents | Unreal Engine 5.7 Documentation | Epic Developer Community)
- 컴파일 후 저
2.2.2. [BP]Interactor 블루프린트 설정#
LearningAgent 폴더에 Learning Agents Interactor 블루프린트 클래스 추가
(이름 : BP_SpiderInteractor)
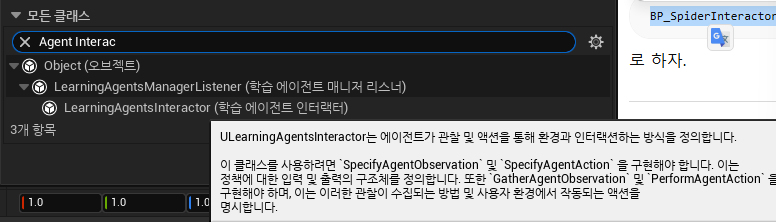
Interactor는 에이전트의 Observation과 Action 구조를 정의하는 객체
이 클래스는
거미 로봇의 현재 상태를 학습기에 전달
학습기가 낸 행동값을 거미 관절 제어에 적용
를 수행한다.
2.2.3. [BP]Interactor Observation / Action 함수 오버라이딩#
이제 이 인터액터 객체에 아래 4가지를 구현해야 한다
(출처 : ULearningAgentsInteractor | Unreal Engine 5.7 Documentation | Epic Developer Community)
1. Specify Agent Observation
2. Specify Agent Action
3. Gather Agent Observation
4. Perform Agent Action
기능 의미 Specify Agent Observation학습기에 어떤 입력값을 줄지 구조 정의 Specify Agent Action학습기가 어떤 출력값을 낼지 구조 정의 Gather Agent Observation매 순간 실제 거미 상태를 읽어서 입력값 채우기 Perform Agent Action출력된 Action을 실제 관절 제어에 연결 인터액터 더블 클릭 → override/재정의 드롭다운 으로 이동
→ 기존 함수 재정의를 통해 특수한 에이전트 observation 을 재정의해야 한다
Override / 재정의를 눌러서 아래 함수를 하나씩 추가Specify Agent Observation Specify Agent Action Gather Agent Observation Perform Agent Action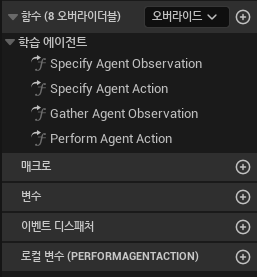
2.2.4. [BP]관절 제어를 위한 Action 구조 설계#
이제 우리가 처음으로 학습시키려는 건
학습기가 각 관절을 움직일 목표값을 출력하도록 만드는 것
이니까,
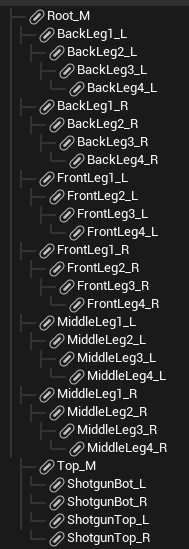
Specify Agent Action에서 연속값 Action을 관절 수만큼 선언해야 한다.→ 현재 다리가 6개에 1개의 다리당 관절이 4개 있으니 총…24개의 Action를 선언해야한다
따라서
BP_SpiderInteractor의Specify Agent Action에서는24차원의 연속 Action을 정의한 이후, 각 Action 값은 이후 아래와 같이 실제 관절 제어값으로 매핑을 수행해야 한다Action[0] → 1번 관절 목표값 Action[1] → 2번 관절 목표값 ... Action[23] → 24번 관절 목표값현재 SpiderJointControllerComponent 는 특정 Constraint 1개를 테스트 제어하는 구조이므로,이후에는 24개 Constraint를 배열로 관리하고, 24개 Action을 각각의 관절 목표 회전값으로 반영할 수 있도록 확장해야 한다.
2.2.5. [BP]Continuous Action 정의#
Specify Continuous Action은 강화학습(Reinforcement Learning)에서 나오는 개념으로, **연속적인 행동 공간(Continuous Action Space)**을 정의하는 것이다.
핵심 개념#
강화학습에서 에이전트의 행동(Action)은 두 가지로 나뉘어짐
| 구분 | 설명 | 예시 |
|---|---|---|
| Discrete Action | 정해진 선택지 중 하나 | 좌/우/점프 버튼 |
| Continuous Action | 실수 범위 내 어떤 값이든 가능 | 핸들 각도 -1.0 ~ 1.0 |
Continuous Action이 필요한 이유#
로봇 팔 제어, 자율주행, 물리 시뮬레이션처럼 세밀한 조작이 필요한 환경에서는 "왼쪽 버튼 누름" 같은 이산적 행동으론 부족하고,대신 "관절을 정확히 37.5도 회전"처럼 연속적인 값이 필요하기 때문이다
현재 여기서의 우리의 목표는 학습을 진행하는 것이 아닌,
Learning Agents가 낸 행동값 24개가
실제 6족 거미 로봇의 24개 관절 제어로 정확히 들어가고,
거미 로봇의 상태가 다시 Learning Agents의 관찰값으로 돌아오는
“입출력 통로”를 완성하는 것
을 확인하는 것이다. 즉 상태→Action 루프가 정상적으로 돌아가는 지 확인하는 것
거미 로봇 상태
→ Observation
→ Learning Agents Policy
→ Action 24개
→ 관절 제어
→ 거미 로봇 상태 변화BP_SpiderInteractor가 바로 이 입출력 통로 역할을 한다. Epic도 Interactor를 “관찰값과 행동값을 통해 에이전트가 환경과 상호작용하는 방식을 정의하는 클래스”로 설명하고 있다(ULearningAgentsInteractor | Unreal Engine 5.7 Documentation | Epic Developer Community) 따
따라서 전체 구조의 틀은….#
BP_SpiderTrainingManager
└─ Learning Agents Manager
   └─ 거미 로봇을 Agent로 등록

BP_SpiderInteractor
├─ Observation 구조 정의
├─ Action 구조 정의
├─ 거미 상태 읽기
└─ 학습기 Action을 로봇으로 전달

BP_SpiderRobot
└─ SpiderJointControllerComponent
   ├─ 24개 관절 Constraint 관리
   ├─ 24개 Action을 실제 목표 각도로 변환
   └─ 관절 상태를 Observation용으로 제공
라고 보면 된다.
세부 항목에 대한 설명#
1. TrainingManager는 “학습 전체 관리자”#
이미 만든 BP_SpiderTrainingManager는:
- 맵에서 거미 로봇 찾기
- Agent 등록
- 이후 Interactor / Trainer / Recorder 연결
을 담당한다.
여기에는 관절 제어 로직을 넣지 않는 게 맞아.
왜냐하면 TrainingManager는
“누구를 학습시킬지”와 “어떤 학습 프로세스를 붙일지”만 관리하는 상위 오브젝트여야,
나중에:
- PPO 학습
- Imitation Learning
- 기록용 Recorder
를 바꿔 끼우기 쉬워지기 때문이야.
2. Interactor는 “학습기와 로봇 사이의 계약서”#
Interactor에서는 두 가지를 정한다.
A. Observation#
학습기가 무엇을 볼 것인가
예:
- 몸체 Pitch / Roll
- 몸체 높이
- 각 관절 각도
- 각 관절 각속도
- 몸체 속도
B. Action#
학습기가 무엇을 출력할 것인가
현재 기준:
- 24개 관절 목표 제어값즉, Interactor는:
학습기 입력 형식
학습기 출력 형식
을 확정하는 곳이야. Epic 문서도 SpecifyAgentObservation, SpecifyAgentAction이 정책 입출력 구조를 정의하고, GatherAgentObservation, PerformAgentAction이 실제 수집과 적용을 담당한다고 설명한다.
3. SpiderJointControllerComponent는 “실제 물리 관절 제어기”#
이건 우리가 이미 C++로 만든 컴포넌트야.
현재는:
Constraint 1개를 찾아서
Sin 파형으로 흔들어보는 테스트 구조
였지.
이걸 앞으로는:
24개 Constraint를 배열로 관리
→ Action[0] ~ Action[23]을 입력받음
→ 각 관절의 목표 회전값으로 변환
→ Physics Constraint motor에 적용
하는 구조로 확장해야 해.
왜 관절 제어를 Interactor 블루프린트에서 직접 안 하냐?#
그렇게 하면 금방 꼬여.
- 24개 관절 이름 관리
- 각 관절별 축 방향 차이
- Action 값을 실제 각도로 변환
- 관절 제한 범위
- 물리 모터 파라미터
이런 것들은 C++ 컴포넌트가 맡는 게 훨씬 안정적이야.
Interactor는 그냥:
24개 Action을 받아서
JointController에 넘긴다
까지만 하면 돼.
최종 데이터 흐름#
1. Action 방향#
Learning Agents
→ BP_SpiderInteractor
→ Perform Agent Action
→ 24개 Action 값 추출
→ SpiderJointControllerComponent::ApplyJointActions(...)
→ 24개 Constraint 목표 회전 갱신
왜 이렇게?#
학습기는 관절 이름이나 물리 Constraint를 알 필요가 없어.
그냥 24차원 행동 벡터만 내면 돼.
관절별 해석은 로봇 전용 제어기에서 담당해야
학습 방식이 PPO든, Imitation이든, 나중에 SAC 외부 연동이든 재사용 가능해진다.
2. Observation 방향#
BP_SpiderRobot / JointController
→ 현재 몸체 자세, 관절 상태 읽기
→ BP_SpiderInteractor
→ Gather Agent Observation
→ Learning Agents에 Observation 전달
왜 이렇게?#
학습기는 로봇 상태를 보고 행동을 내야 하니까,
현재 로봇의:
- 중심 몸체 상태
- 관절 상태
를 정리해서 Observation으로 받아야 한다.
중요한 포인트: 이 구조는 PPO 전용이 아니다#
이걸 먼저 잡는 이유가 바로 여기 있어.
우리가 앞에서 이야기한 것처럼,
걷는 애니메이션이나 시연 데이터를 활용하는 Imitation Learning을 쓸 가능성이 높잖아.
그런데 Epic의 Recorder도 Interactor를 기준으로 Observation과 Action을 기록한다. 즉, 시연 데이터를 녹화하려면 지금 만드는 이 입출력 구조가 먼저 필요하다.
정리하면:
Interactor + JointController 연동은
- PPO 학습에도 필요
- Imitation Learning에도 필요
- 시연 데이터 Recorder에도 필요
한 공통 기반 공사야.
그래서 지금 당장 Trainer를 고르는 것보다
이 입출력 연동을 먼저 완성하는 게 맞다.
Specify Agent Action 함수 그래프 창에 Specify Continuous Action 노드 추가
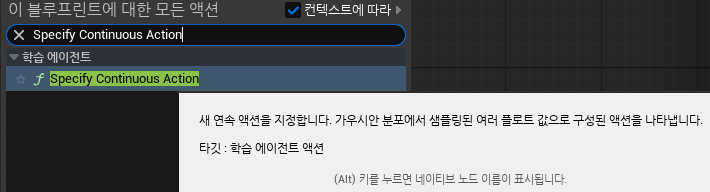
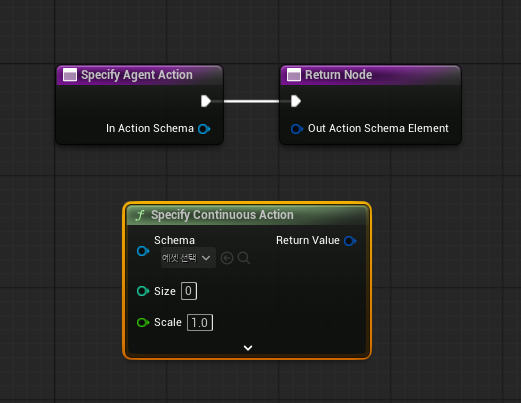
이제 해당 노드에 값을 채워넣어 보자
여기서는
Specify Continuous Action노드를 기존 함수 흐름에 “끼워 넣는” 게 아니라,이 함수가 반환해야 하는 Action Schema Element를 이 노드로 만들어서
Return Node에 넘겨야 함왜
Specify Continuous Action을 쓰는가?#거미 로봇의 관절 제어는 버튼처럼
앞으로 가기
뒤로 가기
점프
이런 이산 행동이 아닌 연속적인 실수값 필요
관절 0 = 0.25
관절 1 = -0.71
관절 2 = 0.13
...
그래서
Discrete Action이 아니라 Continuous Action을 써서 연속값을 받아야 함.즉, 이 노드는“학습기는 실수값 Action 벡터를 출력한다”라고 선언하는 역할
2.2.6. [BP]Specify Continuous Action 핀 연결 및 값 설정#
1. In Action Schema → Specify Continuous Action.Schema#
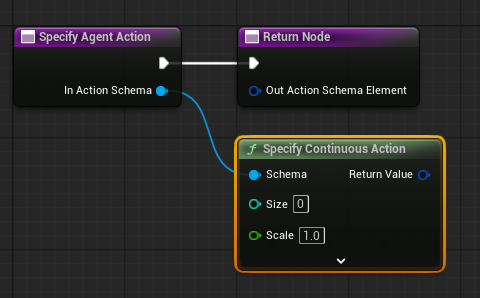
연결하는 이유#
In Action Schema는 이 함수로 들어온 Action 설계도 원본Specify Continuous Action은 그 설계도 안에24개짜리 연속 Action 항목을 추가하는 노드임
그래서 이 In Action Schema 와Specify Continuous Action.Schema 를 연결해야 함
안 연결하면?#
Specify Continuous Action이 어느 Action Schema에 등록되어야 하는지 모르게 됨
즉, 노드는 있어도 Learning Agents의 실제 Action 구조에 제대로 반영되지 않을 수 있음
2. Size = 24#
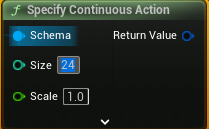
Size는 학습기가 한 번에 출력할 연속값 개수우리 프로젝트에서는 24개 관절을 전부 제어할 거니까 Size = 24 로 둔다
3. Scale = 1.0#
Scale은 Continuous Action 값의 기본 크기를 정하는 값. 쉽게 말하면 학습기가 출력하는 원시 Action 값을 어느 정도 크기로 볼 것인가에 가까움
왜 1.0인가?#
- 지금은 Learning Agents 쪽에서 Action을 일단 정규화된 값으로 받는 게 좋음
Action 값: 대략 -1.0 ~ +1.0그리고 실제 관절 각도 변환은 나중에 C++의
SpiderJointControllerComponent에서 처리.예를 들어 나중에 이렇게 변환 가능
Action = -1.0 → -30도
Action =  0.0 → 기준 자세
Action = +1.0 → +30도
이렇게 역할을 나누면 구조가 깔끔해짐
Interactor
→ 학습 입출력 형식만 정의

SpiderJointControllerComponent
→ Action 값을 실제 관절 각도로 변환
왜 여기서 바로 각도 단위로 키우지 않나?#
예를 들어
Scale = 30.0처럼 크게 잡아버리면, 학습 초기에 랜덤 Action이 바로 큰 관절 움직임으로 들어가서 로봇이 심하게 튀거나 폭주할 수 있음그래서 처음에는:
Scale = 1.0으로 두고, 실제 관절 회전 범위는 제어 컴포넌트에서 안전하게 제한하는 게 좋음
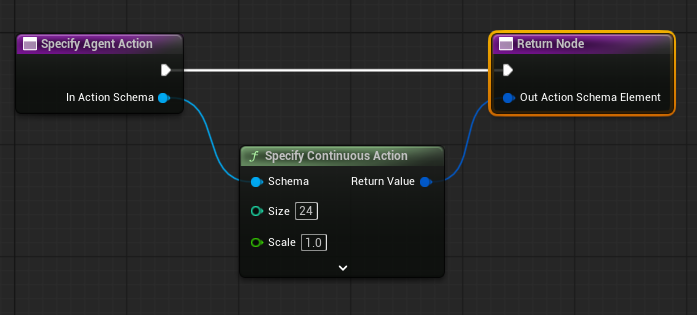
4. Return Value → Return Node.Out Action Schema Element#
연결하는 이유#
Specify Agent Action함수는 마지막에:이 에이전트의 Action 구조는 이것입니다라고 반환해야 함
Specify Continuous Action의Return Value가 바로:24개짜리 Continuous Action 구조그 자체의 값
그래서 이걸
Return Node의:Out Action Schema Element에 꽂아야 함
안 연결하면?#
- 함수 안에서 Continuous Action을 만들어도, 함수가 그 구조를 반환하지 못해서, 나중에 Learning Agents가 Policy나 Trainer를 구성할 때 이 에이전트의 Action 구조가 뭔지 제대로 이어받지 못할 수 있음
연결 완료#
2.2.7. [BP] Perform Agent Action 연결 방향 정의#
지금은 “학습기가 24개 Action을 출력한다”는 형식만 정의한 상태고, 아직 그 24개 값이 실제 로봇 관절로 들어가지는 않는 상태임
다음 작업의 목적은
Learning Agents가 출력한 24개 Action
→ BP_SpiderInteractor에서 꺼냄
→ BP_SpiderRobot의 SpiderJointControllerComponent로 전달
→ 24개 Constraint 목표 회전값 갱신
다만 여기서 바로 블루프린트만으로 끝낼 수는 없고, 기존 C++ 코드가 아직 Constraint 1개만 제어하는 구조라서 먼저 C++ 컴포넌트를 24개 관절 배열 제어 구조로 확장해야 함.
즉 다음 순서는:
1. SpiderJointControllerComponent를 24개 관절 제어용으로 수정
2. BP_SpiderRobot에서 24개 Constraint 이름 배열 설정
3. BP_SpiderInteractor.Perform Agent Action에서 24개 Action을 컨트롤러에 전달
2.2.8. [[C++] SpiderJointControllerComponent를 전체 관절 제어 구조로 확장#
24개 관절 Action 수신용으로 관절 컴포넌트를 수정하는 것이 목적
Learning Agents
→ BP_SpiderInteractor
→ Perform Agent Action
→ SpiderJointControllerComponent.ApplyJointActions(24개 값)
→ 24개 Physics Constraint 목표 회전 갱신
수정 구조
JointConfigs 배열 24개
ResolvedConstraints 배열 24개

Action[0]  → JointConfigs[0]  → Constraint[0]
Action[1]  → JointConfigs[1]  → Constraint[1]
...
Action[23] → JointConfigs[23] → Constraint[23]
1. 헤더파일 수정(SpiderJointControllerComponent.h)#
#pragma once

#include "CoreMinimal.h"
#include "Components/ActorComponent.h"
#include "SpiderJointControllerComponent.generated.h"

class USkeletalMeshComponent;
struct FConstraintInstance;

USTRUCT(BlueprintType)
struct FSpiderJointMotorConfig
{
	GENERATED_BODY()

	// Physics Asset 안에서 제어할 Constraint 이름이다.
	// 코드에 관절 이름을 하드코딩하지 않고 BP_SpiderRobot에서 배열로 지정하기 위해 사용한다.
	UPROPERTY(EditAnywhere, BlueprintReadWrite, Category = "Spider Joint")
	FName ConstraintName = NAME_None;

	// Action 값이 0일 때의 기준 목표 회전이다.
	// 학습기가 아무 조작을 하지 않았을 때 관절이 유지할 기본 자세라고 보면 된다.
	UPROPERTY(EditAnywhere, BlueprintReadWrite, Category = "Spider Joint")
	FRotator BaseTargetOrientation = FRotator::ZeroRotator;

	// Action 값을 실제 회전 각도 변화로 바꾸는 스케일이다.
	// 예: ActionScale.Pitch = 30이면 Action +1.0이 Pitch +30도 의미가 된다.
	UPROPERTY(EditAnywhere, BlueprintReadWrite, Category = "Spider Joint")
	FRotator ActionScale = FRotator(30.0f, 0.0f, 0.0f);

	// 목표 자세를 따라가려는 위치 제어 강도다.
	UPROPERTY(EditAnywhere, BlueprintReadWrite, Category = "Spider Joint")
	float PositionStrength = 5000.0f;

	// 관절 속도 감쇠 강도다. 너무 낮으면 떨림이 커질 수 있다.
	UPROPERTY(EditAnywhere, BlueprintReadWrite, Category = "Spider Joint")
	float VelocityStrength = 500.0f;

	// 관절 모터가 낼 수 있는 최대 힘이다.
	// 0은 엔진 설정에 따라 무제한처럼 동작할 수 있으므로 처음에는 적당한 값으로 제한하는 편이 안전하다.
	UPROPERTY(EditAnywhere, BlueprintReadWrite, Category = "Spider Joint")
	float ForceLimit = 100000.0f;
};

UCLASS(ClassGroup=(Custom), meta=(BlueprintSpawnableComponent))
class YOURPROJECT_API USpiderJointControllerComponent : public UActorComponent
{
	GENERATED_BODY()

public:
	USpiderJointControllerComponent();

protected:
	virtual void BeginPlay() override;

public:
	virtual void TickComponent(
		float DeltaTime,
		ELevelTick TickType,
		FActorComponentTickFunction* ThisTickFunction
	) override;

	// Learning Agents가 출력한 24개 Action 값을 실제 관절 목표 회전으로 적용하는 함수다.
	// Blueprint의 Perform Agent Action에서 호출할 수 있어야 하므로 BlueprintCallable로 연다.
	UFUNCTION(BlueprintCallable, Category = "Spider Joint")
	void ApplyJointActions(const TArray<float>& JointActions);

	// 현재 등록된 제어 관절 수를 반환한다.
	// 나중에 Action 개수 검증이나 디버그 출력에 사용한다.
	UFUNCTION(BlueprintPure, Category = "Spider Joint")
	int32 GetControlledJointCount() const;

private:
	void InitializeControlledConstraints();

protected:
	// 제어할 SkeletalMeshComponent를 직접 지정할 수 있다.
	// 비워두면 Owner에서 첫 번째 SkeletalMeshComponent를 자동으로 찾는다.
	UPROPERTY(EditAnywhere, BlueprintReadWrite, Category = "Spider Joint")
	TObjectPtr<USkeletalMeshComponent> TargetSkeletalMesh = nullptr;

	// 6족 거미 로봇의 제어 대상 관절 설정 배열이다.
	// 여기에는 24개 항목이 들어가는 것이 현재 목표다.
	UPROPERTY(EditAnywhere, BlueprintReadWrite, Category = "Spider Joint")
	TArray<FSpiderJointMotorConfig> JointConfigs;

private:
	UPROPERTY()
	TObjectPtr<USkeletalMeshComponent> ResolvedSkeletalMesh = nullptr;

	// JointConfigs와 같은 순서로 매칭되는 실제 Constraint 포인터 배열이다.
	// Action[i]는 ResolvedConstraints[i]에 적용된다.
	TArray<FConstraintInstance*> ResolvedConstraints;
};
이렇게 해두면 나중에 Blueprint에서 24개 관절을 등록할 때,
JointConfigs[0].ConstraintName = 어떤 관절
JointConfigs[1].ConstraintName = 어떤 관절
...
JointConfigs[23].ConstraintName = 어떤 관절
로 관리 가능. 즉 코드에는 관절 이름이 하나도 안들어가고 학습 Action과 관절 매핑은 BP 설정 배열 순서로 결정
이게 중요한 이유는 나중에
- 관절 순서를 바꾸고 싶을 때
- 특정 다리를 제외하고 싶을 때
- 관절별 회전축이 다를 때
- 6족에서 8족으로 바꾸고 싶을 때
C++ 코드를 다시 뜯지 않고 설정만 바꾸면 되기 때문
2. C++파일 수정(SpiderJointControllerComponent.cpp)#
#include "SpiderJointControllerComponent.h"

#include "Components/SkeletalMeshComponent.h"
#include "PhysicsEngine/ConstraintInstance.h"

USpiderJointControllerComponent::USpiderJointControllerComponent()
{
	// Learning Agents가 Perform Agent Action 단계에서 직접 ApplyJointActions를 호출할 예정이므로,
	// 이 컴포넌트 자체 Tick은 반드시 필요하지 않다.
	// 관절 목표값은 Action이 들어올 때마다 갱신된다.
	PrimaryComponentTick.bCanEverTick = false;
}

void USpiderJointControllerComponent::BeginPlay()
{
	Super::BeginPlay();

	InitializeControlledConstraints();
}

void USpiderJointControllerComponent::TickComponent(
	float DeltaTime,
	ELevelTick TickType,
	FActorComponentTickFunction* ThisTickFunction
)
{
	Super::TickComponent(DeltaTime, TickType, ThisTickFunction);

	// 현재 구조에서는 Tick에서 자동 진동을 만들지 않는다.
	// 관절 제어는 Learning Agents Action 또는 외부 디버그 함수가 ApplyJointActions를 호출할 때 수행한다.
}

void USpiderJointControllerComponent::InitializeControlledConstraints()
{
	ResolvedConstraints.Reset();

	// 1. 제어할 SkeletalMeshComponent 결정
	//
	// TargetSkeletalMesh를 BP에서 직접 지정했다면 그걸 우선 사용한다.
	// 비워두었다면 Owner Actor 안에서 첫 번째 SkeletalMeshComponent를 자동으로 찾는다.
	if (TargetSkeletalMesh != nullptr)
	{
		ResolvedSkeletalMesh = TargetSkeletalMesh;
	}
	else if (GetOwner() != nullptr)
	{
		ResolvedSkeletalMesh = GetOwner()->FindComponentByClass<USkeletalMeshComponent>();
	}

	if (ResolvedSkeletalMesh == nullptr)
	{
		UE_LOG(
			LogTemp,
			Warning,
			TEXT("[SpiderJointController] SkeletalMeshComponent를 찾지 못했습니다.")
		);
		return;
	}

	if (JointConfigs.Num() == 0)
	{
		UE_LOG(
			LogTemp,
			Warning,
			TEXT("[SpiderJointController] JointConfigs가 비어 있습니다. 제어할 Constraint를 BP에서 등록해야 합니다.")
		);
		return;
	}

	ResolvedConstraints.Reserve(JointConfigs.Num());

	// 2. JointConfigs에 등록된 Constraint들을 실제 Physics Asset에서 찾는다.
	//
	// 중요한 점:
	// ResolvedConstraints 배열은 JointConfigs와 같은 순서를 유지한다.
	// 따라서 Action[i]는 JointConfigs[i] / ResolvedConstraints[i]에 대응한다.
	for (int32 Index = 0; Index < JointConfigs.Num(); ++Index)
	{
		const FSpiderJointMotorConfig& Config = JointConfigs[Index];

		if (Config.ConstraintName.IsNone())
		{
			UE_LOG(
				LogTemp,
				Warning,
				TEXT("[SpiderJointController] JointConfigs[%d]의 ConstraintName이 비어 있습니다."),
				Index
			);

			ResolvedConstraints.Add(nullptr);
			continue;
		}

		FConstraintInstance* Constraint = ResolvedSkeletalMesh->FindConstraintInstance(Config.ConstraintName);

		if (Constraint == nullptr)
		{
			UE_LOG(
				LogTemp,
				Warning,
				TEXT("[SpiderJointController] Constraint '%s'를 찾지 못했습니다. Index=%d"),
				*Config.ConstraintName.ToString(),
				Index
			);

			ResolvedConstraints.Add(nullptr);
			continue;
		}

		// 3. 각 Constraint의 Angular Motor 설정
		//
		// SLERP 모드는 목표 회전 Quaternion을 향해 관절을 움직이게 하는 방식이다.
		// 현재는 학습기가 직접 토크를 내는 구조가 아니라,
		// 목표 자세를 출력하고 Physics Constraint Motor가 그 자세를 추종하는 구조다.
		Constraint->SetAngularDriveMode(EAngularDriveMode::SLERP);
		Constraint->SetOrientationDriveSLERP(true);

		// PositionStrength:
		// 목표 회전에 얼마나 강하게 따라갈지 결정한다.
		//
		// VelocityStrength:
		// 움직임의 감쇠 성격이다. 너무 낮으면 떨림이 커질 수 있고,
		// 너무 높으면 반응이 둔해질 수 있다.
		//
		// ForceLimit:
		// 모터가 낼 수 있는 최대 힘이다.
		// 너무 크면 학습 초기 랜덤 Action에서 로봇이 과하게 튈 수 있고,
		// 너무 작으면 관절이 목표값을 따라가지 못한다.
		Constraint->SetAngularDriveParams(
			Config.PositionStrength,
			Config.VelocityStrength,
			Config.ForceLimit
		);

		// Action 값이 0일 때의 기준 자세를 먼저 적용한다.
		Constraint->SetAngularOrientationTarget(
			Config.BaseTargetOrientation.Quaternion()
		);

		ResolvedConstraints.Add(Constraint);

		UE_LOG(
			LogTemp,
			Log,
			TEXT("[SpiderJointController] Joint[%d] Constraint '%s' 초기화 완료."),
			Index,
			*Config.ConstraintName.ToString()
		);
	}

	UE_LOG(
		LogTemp,
		Log,
		TEXT("[SpiderJointController] 제어 관절 초기화 완료. JointConfigs=%d, ResolvedConstraints=%d"),
		JointConfigs.Num(),
		ResolvedConstraints.Num()
	);
}

void USpiderJointControllerComponent::ApplyJointActions(const TArray<float>& JointActions)
{
	// 아직 Constraint 초기화가 안 된 상태라면 한 번 시도한다.
	// BeginPlay 순서나 BP 호출 순서 문제로 ResolvedConstraints가 비어 있을 수 있기 때문이다.
	if (ResolvedConstraints.Num() == 0)
	{
		InitializeControlledConstraints();
	}

	if (JointConfigs.Num() == 0 || ResolvedConstraints.Num() == 0)
	{
		return;
	}

	if (JointActions.Num() != JointConfigs.Num() && !bLoggedActionCountMismatch)
	{
		UE_LOG(
			LogTemp,
			Warning,
			TEXT("[SpiderJointController] Action 개수와 JointConfigs 개수가 다릅니다. Actions=%d, JointConfigs=%d"),
			JointActions.Num(),
			JointConfigs.Num()
		);

		bLoggedActionCountMismatch = true;
	}

	// Action 개수가 다르더라도 가능한 범위까지만 적용한다.
	// 이렇게 하면 테스트 중 일부 Action만 들어와도 에디터가 멈추지 않고 동작을 확인할 수 있다.
	const int32 ApplyCount = FMath::Min3(
		JointActions.Num(),
		JointConfigs.Num(),
		ResolvedConstraints.Num()
	);

	for (int32 Index = 0; Index < ApplyCount; ++Index)
	{
		FConstraintInstance* Constraint = ResolvedConstraints[Index];

		if (Constraint == nullptr)
		{
			continue;
		}

		const FSpiderJointMotorConfig& Config = JointConfigs[Index];

		// Learning Agents의 Continuous Action은 기본적으로 정규화된 제어값으로 사용할 것이다.
		// 따라서 여기서는 안전하게 -1.0 ~ +1.0 범위로 제한한다.
		//
		// 왜 Clamp를 하냐?
		// 학습 초기에는 랜덤 정책이 예상보다 큰 값을 만들 수 있다.
		// 이 값을 그대로 각도에 곱하면 관절이 과도하게 꺾이거나 물리 폭주가 날 수 있다.
		const float ActionValue = FMath::Clamp(JointActions[Index], -1.0f, 1.0f);

		// ActionValue 하나를 관절 하나의 목표 회전 변화량으로 변환한다.
		//
		// BaseTargetOrientation:
		//   Action이 0일 때의 기준 자세
		//
		// ActionScale:
		//   Action -1~+1을 Pitch/Yaw/Roll 각도 변화로 바꾸는 스케일
		//
		// 예:
		//   BaseTargetOrientation = (0, 0, 0)
		//   ActionScale.Pitch = 30
		//   ActionValue = 1
		//   → Pitch +30도 목표
		FRotator TargetOrientation = Config.BaseTargetOrientation;
		TargetOrientation.Pitch += Config.ActionScale.Pitch * ActionValue;
		TargetOrientation.Yaw += Config.ActionScale.Yaw * ActionValue;
		TargetOrientation.Roll += Config.ActionScale.Roll * ActionValue;

		Constraint->SetAngularOrientationTarget(
			TargetOrientation.Quaternion()
		);
	}
}

int32 USpiderJointControllerComponent::GetControlledJointCount() const
{
	// Learning Agents의 Action Size와 비교할 기준값으로 사용한다.
	// 현재 설계에서는 JointConfigs 항목 수가 곧 제어 채널 수다.
	return JointConfigs.Num();
}
코드 설명
JointConfigs
이 배열이 이제 관절 제어 설정표
JointConfigs[0] → Action[0]
JointConfigs[1] → Action[1]
...
JointConfigs[23] → Action[23]
왜 배열로 하냐면, 관절 이름을 C++에 박아두면 모델이 바뀔 때마다 코드를 다시 수정해야 하기 때문
배열로 두면
BP_SpiderRobot에서 설정만 바꾸면 된다.
InitializeControlledConstraints()
- 이 함수는
JointConfigs에 적힌 Constraint 이름을 실제 Physics Asset에서 찾아서ResolvedConstraints에 저장 - 왜 저장하냐면, 매 프레임마다 이름으로 Constraint를 찾으면 비효율적이기 때문에, 처음 한 번 찾아두고, 이후에는 포인터 배열로 바로 접근하도록 함
ApplyJointActions()
- 이게 Learning Agents와 연결될 핵심 함수
- 나중에
BP_SpiderInteractor의Perform Agent Action에서 24개 Action 값을 꺼낸 뒤, 이 함수에 전달
Learning Agents Action[24]
→ ApplyJointActions
→ 각 Constraint 목표 회전 갱신
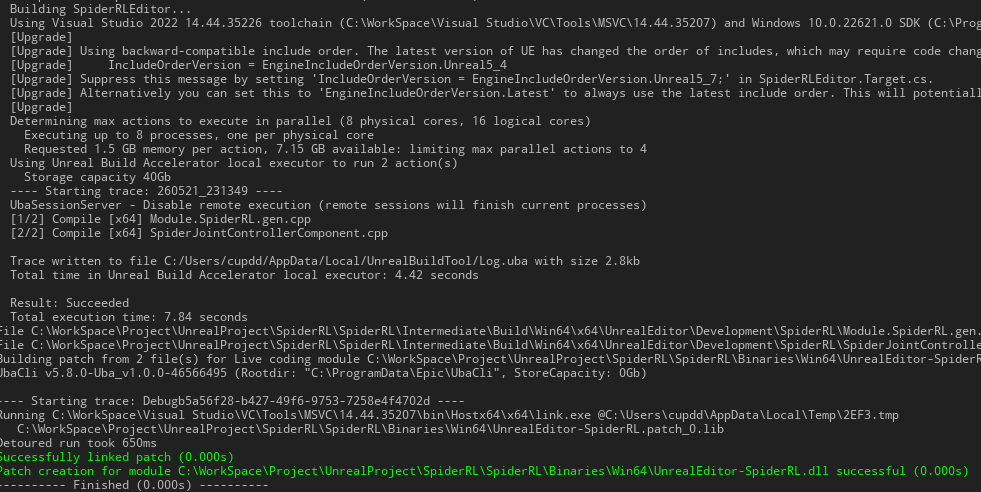
저장 후 빌드
2.2.9. BP_SpiderRobot 내부 JointConfigs 직접 설정 방식의 문제점#
우리가 C++에서 만든 구조는
TArray<FSpiderJointMotorConfig>JointConfigs;이 배열은 학습 Action 24개가 어떤 실제 Physics Constraint에 연결될지 정하는 매핑표다.
Action[0]  → JointConfigs[0]  → Constraint 0
Action[1]  → JointConfigs[1]  → Constraint 1
...
Action[23] → JointConfigs[23] → Constraint 23
이 배열을 채우지 않으면, Learning Agents가 24개 Action을 출력해도 C++ 컴포넌트는 어떤 관절을 움직여야 하는지 모름
BP_SpiderRobot 더블클릭 → 왼쪽 컴포넌트 목록에서 우리가 생성한 SpiderJointController 선택
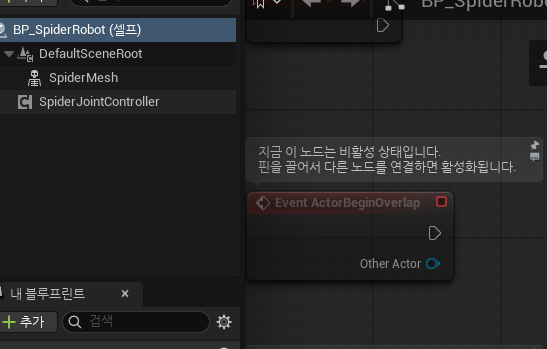
우리가 코드로 추가한 항목들 보이는지 확인
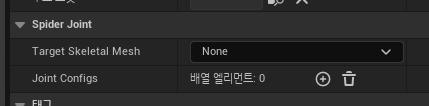
디테일 패널 →
Target Skeletal Mesh에SpiderMesh지정(없으면 일단 PASS)Joint Config 배열 24개 추가 및 관절 이름들 Constraint Name에 넣기를 하면 너무나 빡세다(24개를 언제 다넣나…). C++의 구조가 바뀌거나 블루포인트가 컴파일될 때, 언리얼이 컴포넌트 탬플릿을 재생성하면서 JointConfigs에 직접 넣은 24개 값이 날아갈 수 있는 문제가 있다(실제로 2번 정도 당했다).
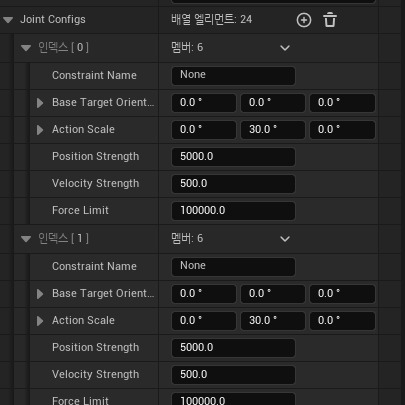
- 따라서 블루포인트 안에 24개의 값을 직접 넣지 말고, 설정 에셋 하나만 참조하게 만들어서, 다시 컴파일되어도 24개의 관절 목록은 따로 분리되어 저장할 수 있어서 훨씬 안전하다.
FSpiderJointMotorConfig
#include "SpiderJointControllerComponent.h"

#include "Components/SkeletalMeshComponent.h"
#include "PhysicsEngine/ConstraintInstance.h"

USpiderJointControllerComponent::USpiderJointControllerComponent()
{
	// Learning Agents의 Perform Agent Action 단계에서 ApplyJointActions를 호출할 예정이므로,
	// 이 컴포넌트가 자체 Tick으로 목표값을 계속 바꿀 필요는 없다.
	PrimaryComponentTick.bCanEverTick = false;
}

void USpiderJointControllerComponent::BeginPlay()
{
	Super::BeginPlay();

	InitializeControlledConstraints();
}

void USpiderJointControllerComponent::TickComponent(
	float DeltaTime,
	ELevelTick TickType,
	FActorComponentTickFunction* ThisTickFunction
)
{
	Super::TickComponent(DeltaTime, TickType, ThisTickFunction);

	// 현재 구조에서는 Tick에서 자동 진동을 만들지 않는다.
	// 관절 제어는 Learning Agents Action 또는 외부 디버그 함수가 ApplyJointActions를 호출할 때 수행한다.
}

const TArray<FSpiderJointMotorConfig>* USpiderJointControllerComponent::GetActiveJointConfigs() const
{
	if (JointConfigData != nullptr)
	{
		return &JointConfigData->JointConfigs;
	}

	return &JointConfigs;
}

void USpiderJointControllerComponent::InitializeControlledConstraints()
{
	ResolvedConstraints.Reset();
	bLoggedActionCountMismatch = false;

	// 1. 제어할 SkeletalMeshComponent 결정
	//
	// TargetSkeletalMesh를 BP에서 직접 지정했다면 그걸 우선 사용한다.
	// 비워두었다면 Owner Actor 안에서 첫 번째 SkeletalMeshComponent를 자동으로 찾는다.
	if (TargetSkeletalMesh != nullptr)
	{
		ResolvedSkeletalMesh = TargetSkeletalMesh;
	}
	else if (GetOwner() != nullptr)
	{
		ResolvedSkeletalMesh = GetOwner()->FindComponentByClass<USkeletalMeshComponent>();
	}

	if (ResolvedSkeletalMesh == nullptr)
	{
		UE_LOG(
			LogTemp,
			Warning,
			TEXT("[SpiderJointController] SkeletalMeshComponent를 찾지 못했습니다.")
		);
		return;
	}

	const TArray<FSpiderJointMotorConfig>* ActiveJointConfigs = GetActiveJointConfigs();

	if (ActiveJointConfigs == nullptr || ActiveJointConfigs->Num() == 0)
	{
		UE_LOG(
			LogTemp,
			Warning,
			TEXT("[SpiderJointController] 관절 설정이 비어 있습니다. JointConfigData 또는 JointConfigs를 설정해야 합니다.")
		);
		return;
	}

	ResolvedConstraints.Reserve(ActiveJointConfigs->Num());

	// 2. ActiveJointConfigs에 등록된 Constraint들을 실제 Physics Asset에서 찾는다.
	//
	// 중요한 점:
	// ResolvedConstraints 배열은 ActiveJointConfigs와 같은 순서를 유지한다.
	// 따라서 Action[i]는 ActiveJointConfigs[i] / ResolvedConstraints[i]에 대응한다.
	for (int32 Index = 0; Index < ActiveJointConfigs->Num(); ++Index)
	{
		const FSpiderJointMotorConfig& Config = (*ActiveJointConfigs)[Index];

		if (Config.ConstraintName.IsNone())
		{
			UE_LOG(
				LogTemp,
				Warning,
				TEXT("[SpiderJointController] JointConfig[%d]의 ConstraintName이 비어 있습니다."),
				Index
			);

			ResolvedConstraints.Add(nullptr);
			continue;
		}

		FConstraintInstance* Constraint = ResolvedSkeletalMesh->FindConstraintInstance(Config.ConstraintName);

		if (Constraint == nullptr)
		{
			UE_LOG(
				LogTemp,
				Warning,
				TEXT("[SpiderJointController] Constraint '%s'를 찾지 못했습니다. Index=%d"),
				*Config.ConstraintName.ToString(),
				Index
			);

			ResolvedConstraints.Add(nullptr);
			continue;
		}

		// 3. 각 Constraint의 Angular Motor 설정
		//
		// SLERP 모드는 목표 회전 Quaternion을 향해 관절을 움직이게 하는 방식이다.
		// 현재는 학습기가 직접 토크를 내는 구조가 아니라,
		// 목표 자세를 출력하고 Physics Constraint Motor가 그 자세를 추종하는 구조다.
		Constraint->SetAngularDriveMode(EAngularDriveMode::SLERP);
		Constraint->SetOrientationDriveSLERP(true);

		// PositionStrength:
		//   목표 회전에 얼마나 강하게 따라갈지 결정한다.
		//
		// VelocityStrength:
		//   움직임의 감쇠 성격이다.
		//   너무 낮으면 떨림이 커질 수 있고, 너무 높으면 반응이 둔해질 수 있다.
		//
		// ForceLimit:
		//   모터가 낼 수 있는 최대 힘이다.
		//   너무 크면 학습 초기 랜덤 Action에서 로봇이 과하게 튈 수 있고,
		//   너무 작으면 관절이 목표값을 따라가지 못한다.
		Constraint->SetAngularDriveParams(
			Config.PositionStrength,
			Config.VelocityStrength,
			Config.ForceLimit
		);

		// Action 값이 0일 때의 기준 자세를 먼저 적용한다.
		Constraint->SetAngularOrientationTarget(
			Config.BaseTargetOrientation.Quaternion()
		);

		ResolvedConstraints.Add(Constraint);

		UE_LOG(
			LogTemp,
			Log,
			TEXT("[SpiderJointController] Joint[%d] Constraint '%s' 초기화 완료."),
			Index,
			*Config.ConstraintName.ToString()
		);
	}

	UE_LOG(
		LogTemp,
		Log,
		TEXT("[SpiderJointController] 제어 관절 초기화 완료. Configs=%d, ResolvedConstraints=%d, Source=%s"),
		ActiveJointConfigs->Num(),
		ResolvedConstraints.Num(),
		JointConfigData != nullptr ? TEXT("DataAsset") : TEXT("Component")
	);
}

void USpiderJointControllerComponent::ApplyJointActions(const TArray<float>& JointActions)
{
	// 아직 Constraint 초기화가 안 된 상태라면 한 번 시도한다.
	// BeginPlay 순서나 BP 호출 순서 문제로 ResolvedConstraints가 비어 있을 수 있기 때문이다.
	if (ResolvedConstraints.Num() == 0)
	{
		InitializeControlledConstraints();
	}

	const TArray<FSpiderJointMotorConfig>* ActiveJointConfigs = GetActiveJointConfigs();

	if (ActiveJointConfigs == nullptr || ActiveJointConfigs->Num() == 0 || ResolvedConstraints.Num() == 0)
	{
		return;
	}

	if (JointActions.Num() != ActiveJointConfigs->Num() && !bLoggedActionCountMismatch)
	{
		UE_LOG(
			LogTemp,
			Warning,
			TEXT("[SpiderJointController] Action 개수와 관절 설정 개수가 다릅니다. Actions=%d, Configs=%d"),
			JointActions.Num(),
			ActiveJointConfigs->Num()
		);

		bLoggedActionCountMismatch = true;
	}

	// Action 개수가 다르더라도 가능한 범위까지만 적용한다.
	// 이렇게 하면 테스트 중 일부 Action만 들어와도 에디터가 멈추지 않고 동작을 확인할 수 있다.
	const int32 ApplyCount = FMath::Min3(
		JointActions.Num(),
		ActiveJointConfigs->Num(),
		ResolvedConstraints.Num()
	);

	for (int32 Index = 0; Index < ApplyCount; ++Index)
	{
		FConstraintInstance* Constraint = ResolvedConstraints[Index];

		if (Constraint == nullptr)
		{
			continue;
		}

		const FSpiderJointMotorConfig& Config = (*ActiveJointConfigs)[Index];

		// Learning Agents의 Continuous Action은 정규화된 제어값으로 사용할 것이다.
		// 따라서 여기서는 안전하게 -1.0 ~ +1.0 범위로 제한한다.
		//
		// Clamp를 하는 이유:
		// 학습 초기에는 랜덤 정책이 예상보다 큰 값을 만들 수 있다.
		// 이 값을 그대로 각도에 곱하면 관절이 과도하게 꺾이거나 물리 폭주가 날 수 있다.
		const float ActionValue = FMath::Clamp(JointActions[Index], -1.0f, 1.0f);

		// ActionValue 하나를 관절 하나의 목표 회전 변화량으로 변환한다.
		//
		// BaseTargetOrientation:
		//   Action이 0일 때의 기준 자세
		//
		// ActionScale:
		//   Action -1~+1을 Pitch/Yaw/Roll 각도 변화로 바꾸는 스케일
		//
		// 예:
		//   BaseTargetOrientation = (0, 0, 0)
		//   ActionScale.Pitch = 30
		//   ActionValue = 1
		//   → Pitch +30도 목표
		FRotator TargetOrientation = Config.BaseTargetOrientation;
		TargetOrientation.Pitch += Config.ActionScale.Pitch * ActionValue;
		TargetOrientation.Yaw += Config.ActionScale.Yaw * ActionValue;
		TargetOrientation.Roll += Config.ActionScale.Roll * ActionValue;

		Constraint->SetAngularOrientationTarget(
			TargetOrientation.Quaternion()
		);
	}
}

int32 USpiderJointControllerComponent::GetControlledJointCount() const
{
	const TArray<FSpiderJointMotorConfig>* ActiveJointConfigs = GetActiveJointConfigs();

	if (ActiveJointConfigs == nullptr)
	{
		return 0;
	}

	return ActiveJointConfigs->Num();
}- 따라서 UDataAsset 클래스를 하나 추가해서 관절 설정만 저장해서 사용하도록 하자
USpiderJointControllerComponent.h
#pragma once

#include "CoreMinimal.h"
#include "Components/ActorComponent.h"
#include "Engine/DataAsset.h"
#include "SpiderJointControllerComponent.generated.h"

class USkeletalMeshComponent;
struct FConstraintInstance;

USTRUCT(BlueprintType)
struct FSpiderJointMotorConfig
{
	GENERATED_BODY()

	// Physics Asset 안에서 제어할 Constraint 이름이다.
	// 코드에 관절 이름을 하드코딩하지 않고 Data Asset에서 설정하기 위해 사용한다.
	UPROPERTY(EditAnywhere, BlueprintReadWrite, Category = "Spider Joint")
	FName ConstraintName = NAME_None;

	// Action 값이 0일 때의 기준 목표 회전이다.
	// 학습기가 아무 조작을 하지 않았을 때 관절이 유지할 기본 자세라고 보면 된다.
	UPROPERTY(EditAnywhere, BlueprintReadWrite, Category = "Spider Joint")
	FRotator BaseTargetOrientation = FRotator::ZeroRotator;

	// Action 값을 실제 회전 각도 변화로 바꾸는 스케일이다.
	// 예: ActionScale.Pitch = 30이면 Action +1.0이 Pitch +30도 의미가 된다.
	UPROPERTY(EditAnywhere, BlueprintReadWrite, Category = "Spider Joint")
	FRotator ActionScale = FRotator(30.0f, 0.0f, 0.0f);

	// 목표 자세를 따라가려는 위치 제어 강도다.
	UPROPERTY(EditAnywhere, BlueprintReadWrite, Category = "Spider Joint")
	float PositionStrength = 5000.0f;

	// 관절 속도 감쇠 강도다.
	// 너무 낮으면 떨림이 커질 수 있고, 너무 높으면 반응이 둔해질 수 있다.
	UPROPERTY(EditAnywhere, BlueprintReadWrite, Category = "Spider Joint")
	float VelocityStrength = 500.0f;

	// 관절 모터가 낼 수 있는 최대 힘이다.
	// 너무 크면 물리 폭주 가능성이 있고, 너무 작으면 관절이 목표값을 따라가지 못할 수 있다.
	UPROPERTY(EditAnywhere, BlueprintReadWrite, Category = "Spider Joint")
	float ForceLimit = 100000.0f;
};

UCLASS(BlueprintType)
class SPIDERRL_API USpiderJointConfigData : public UDataAsset
{
	GENERATED_BODY()

public:
	// 6족 거미 로봇의 관절 설정 목록이다.
	// 현재 목표는 6개 다리 × 다리당 4개 Constraint = 24개 항목이다.
	//
	// 이 값을 BP 컴포넌트 안에 직접 저장하지 않고 Data Asset으로 분리하는 이유:
	// - BP 컴파일/컴포넌트 재생성 때 설정이 날아가는 위험을 줄이기 위해
	// - 6족/8족/테스트용 설정을 에셋 단위로 교체하기 위해
	// - C++ 코드에 관절 이름을 하드코딩하지 않기 위해
	UPROPERTY(EditAnywhere, BlueprintReadWrite, Category = "Spider Joint")
	TArray<FSpiderJointMotorConfig> JointConfigs;
};

UCLASS(ClassGroup=(Custom), meta=(BlueprintSpawnableComponent))
class SPIDERRL_API USpiderJointControllerComponent : public UActorComponent
{
	GENERATED_BODY()

public:
	USpiderJointControllerComponent();

protected:
	virtual void BeginPlay() override;

public:
	virtual void TickComponent(
		float DeltaTime,
		ELevelTick TickType,
		FActorComponentTickFunction* ThisTickFunction
	) override;

	// Learning Agents가 출력한 Action 배열을 실제 관절 목표 회전으로 적용한다.
	//
	// JointActions[i]는 ActiveJointConfigs[i]에 대응한다.
	// 현재 설계에서는 24개 Action이 24개 Constraint에 대응한다.
	UFUNCTION(BlueprintCallable, Category = "Spider Joint")
	void ApplyJointActions(const TArray<float>& JointActions);

	// 현재 등록된 제어 관절 수를 반환한다.
	// Learning Agents의 Action Size와 비교하거나 디버그 출력에 사용한다.
	UFUNCTION(BlueprintPure, Category = "Spider Joint")
	int32 GetControlledJointCount() const;

private:
	void InitializeControlledConstraints();

	// 실제로 사용할 관절 설정 배열을 반환한다.
	// JointConfigData가 있으면 Data Asset 설정을 우선 사용하고,
	// 없으면 컴포넌트 내부 JointConfigs를 fallback으로 사용한다.
	const TArray<FSpiderJointMotorConfig>* GetActiveJointConfigs() const;

protected:
	// 제어할 SkeletalMeshComponent를 직접 지정할 수 있다.
	// 비워두면 Owner에서 첫 번째 SkeletalMeshComponent를 자동으로 찾는다.
	UPROPERTY(EditAnywhere, BlueprintReadWrite, Category = "Spider Joint")
	TObjectPtr<USkeletalMeshComponent> TargetSkeletalMesh = nullptr;

	// 관절 설정 Data Asset이다.
	// 실제 프로젝트에서는 여기에 DA_SpiderJointConfig 같은 에셋을 넣는 것을 권장한다.
	UPROPERTY(EditAnywhere, BlueprintReadWrite, Category = "Spider Joint")
	TObjectPtr<USpiderJointConfigData> JointConfigData = nullptr;

	// fallback용 내부 관절 설정 배열이다.
	// JointConfigData가 없을 때만 사용한다.
	// 실제 운영에서는 Data Asset 사용을 우선한다.
	UPROPERTY(EditAnywhere, BlueprintReadWrite, Category = "Spider Joint")
	TArray<FSpiderJointMotorConfig> JointConfigs;

private:
	UPROPERTY()
	TObjectPtr<USkeletalMeshComponent> ResolvedSkeletalMesh = nullptr;

	// ActiveJointConfigs와 같은 순서로 매칭되는 실제 Constraint 포인터 배열이다.
	// Action[i]는 ResolvedConstraints[i]에 적용된다.
	TArray<FConstraintInstance*> ResolvedConstraints;

	// Action 개수 불일치 경고를 매 프레임 반복 출력하지 않기 위한 플래그다.
	bool bLoggedActionCountMismatch = false;
};
SpiderJointControllerComponent.cpp
#include "SpiderJointControllerComponent.h"

#include "Components/SkeletalMeshComponent.h"
#include "PhysicsEngine/ConstraintInstance.h"

USpiderJointControllerComponent::USpiderJointControllerComponent()
{
	// Learning Agents의 Perform Agent Action 단계에서 ApplyJointActions를 호출할 예정이므로,
	// 이 컴포넌트가 자체 Tick으로 목표값을 계속 바꿀 필요는 없다.
	PrimaryComponentTick.bCanEverTick = false;
}

void USpiderJointControllerComponent::BeginPlay()
{
	Super::BeginPlay();

	InitializeControlledConstraints();
}

void USpiderJointControllerComponent::TickComponent(
	float DeltaTime,
	ELevelTick TickType,
	FActorComponentTickFunction* ThisTickFunction
)
{
	Super::TickComponent(DeltaTime, TickType, ThisTickFunction);

	// 현재 구조에서는 Tick에서 자동 진동을 만들지 않는다.
	// 관절 제어는 Learning Agents Action 또는 외부 디버그 함수가 ApplyJointActions를 호출할 때 수행한다.
}

const TArray<FSpiderJointMotorConfig>* USpiderJointControllerComponent::GetActiveJointConfigs() const
{
	if (JointConfigData != nullptr)
	{
		return &JointConfigData->JointConfigs;
	}

	return &JointConfigs;
}

void USpiderJointControllerComponent::InitializeControlledConstraints()
{
	ResolvedConstraints.Reset();
	bLoggedActionCountMismatch = false;

	// 1. 제어할 SkeletalMeshComponent 결정
	//
	// TargetSkeletalMesh를 BP에서 직접 지정했다면 그걸 우선 사용한다.
	// 비워두었다면 Owner Actor 안에서 첫 번째 SkeletalMeshComponent를 자동으로 찾는다.
	if (TargetSkeletalMesh != nullptr)
	{
		ResolvedSkeletalMesh = TargetSkeletalMesh;
	}
	else if (GetOwner() != nullptr)
	{
		ResolvedSkeletalMesh = GetOwner()->FindComponentByClass<USkeletalMeshComponent>();
	}

	if (ResolvedSkeletalMesh == nullptr)
	{
		UE_LOG(
			LogTemp,
			Warning,
			TEXT("[SpiderJointController] SkeletalMeshComponent를 찾지 못했습니다.")
		);
		return;
	}

	const TArray<FSpiderJointMotorConfig>* ActiveJointConfigs = GetActiveJointConfigs();

	if (ActiveJointConfigs == nullptr || ActiveJointConfigs->Num() == 0)
	{
		UE_LOG(
			LogTemp,
			Warning,
			TEXT("[SpiderJointController] 관절 설정이 비어 있습니다. JointConfigData 또는 JointConfigs를 설정해야 합니다.")
		);
		return;
	}

	ResolvedConstraints.Reserve(ActiveJointConfigs->Num());

	// 2. ActiveJointConfigs에 등록된 Constraint들을 실제 Physics Asset에서 찾는다.
	//
	// 중요한 점:
	// ResolvedConstraints 배열은 ActiveJointConfigs와 같은 순서를 유지한다.
	// 따라서 Action[i]는 ActiveJointConfigs[i] / ResolvedConstraints[i]에 대응한다.
	for (int32 Index = 0; Index < ActiveJointConfigs->Num(); ++Index)
	{
		const FSpiderJointMotorConfig& Config = (*ActiveJointConfigs)[Index];

		if (Config.ConstraintName.IsNone())
		{
			UE_LOG(
				LogTemp,
				Warning,
				TEXT("[SpiderJointController] JointConfig[%d]의 ConstraintName이 비어 있습니다."),
				Index
			);

			ResolvedConstraints.Add(nullptr);
			continue;
		}

		FConstraintInstance* Constraint = ResolvedSkeletalMesh->FindConstraintInstance(Config.ConstraintName);

		if (Constraint == nullptr)
		{
			UE_LOG(
				LogTemp,
				Warning,
				TEXT("[SpiderJointController] Constraint '%s'를 찾지 못했습니다. Index=%d"),
				*Config.ConstraintName.ToString(),
				Index
			);

			ResolvedConstraints.Add(nullptr);
			continue;
		}

		// 3. 각 Constraint의 Angular Motor 설정
		//
		// SLERP 모드는 목표 회전 Quaternion을 향해 관절을 움직이게 하는 방식이다.
		// 현재는 학습기가 직접 토크를 내는 구조가 아니라,
		// 목표 자세를 출력하고 Physics Constraint Motor가 그 자세를 추종하는 구조다.
		Constraint->SetAngularDriveMode(EAngularDriveMode::SLERP);
		Constraint->SetOrientationDriveSLERP(true);

		// PositionStrength:
		//   목표 회전에 얼마나 강하게 따라갈지 결정한다.
		//
		// VelocityStrength:
		//   움직임의 감쇠 성격이다.
		//   너무 낮으면 떨림이 커질 수 있고, 너무 높으면 반응이 둔해질 수 있다.
		//
		// ForceLimit:
		//   모터가 낼 수 있는 최대 힘이다.
		//   너무 크면 학습 초기 랜덤 Action에서 로봇이 과하게 튈 수 있고,
		//   너무 작으면 관절이 목표값을 따라가지 못한다.
		Constraint->SetAngularDriveParams(
			Config.PositionStrength,
			Config.VelocityStrength,
			Config.ForceLimit
		);

		// Action 값이 0일 때의 기준 자세를 먼저 적용한다.
		Constraint->SetAngularOrientationTarget(
			Config.BaseTargetOrientation.Quaternion()
		);

		ResolvedConstraints.Add(Constraint);

		UE_LOG(
			LogTemp,
			Log,
			TEXT("[SpiderJointController] Joint[%d] Constraint '%s' 초기화 완료."),
			Index,
			*Config.ConstraintName.ToString()
		);
	}

	UE_LOG(
		LogTemp,
		Log,
		TEXT("[SpiderJointController] 제어 관절 초기화 완료. Configs=%d, ResolvedConstraints=%d, Source=%s"),
		ActiveJointConfigs->Num(),
		ResolvedConstraints.Num(),
		JointConfigData != nullptr ? TEXT("DataAsset") : TEXT("Component")
	);
}

void USpiderJointControllerComponent::ApplyJointActions(const TArray<float>& JointActions)
{
	// 아직 Constraint 초기화가 안 된 상태라면 한 번 시도한다.
	// BeginPlay 순서나 BP 호출 순서 문제로 ResolvedConstraints가 비어 있을 수 있기 때문이다.
	if (ResolvedConstraints.Num() == 0)
	{
		InitializeControlledConstraints();
	}

	const TArray<FSpiderJointMotorConfig>* ActiveJointConfigs = GetActiveJointConfigs();

	if (ActiveJointConfigs == nullptr || ActiveJointConfigs->Num() == 0 || ResolvedConstraints.Num() == 0)
	{
		return;
	}

	if (JointActions.Num() != ActiveJointConfigs->Num() && !bLoggedActionCountMismatch)
	{
		UE_LOG(
			LogTemp,
			Warning,
			TEXT("[SpiderJointController] Action 개수와 관절 설정 개수가 다릅니다. Actions=%d, Configs=%d"),
			JointActions.Num(),
			ActiveJointConfigs->Num()
		);

		bLoggedActionCountMismatch = true;
	}

	// Action 개수가 다르더라도 가능한 범위까지만 적용한다.
	// 이렇게 하면 테스트 중 일부 Action만 들어와도 에디터가 멈추지 않고 동작을 확인할 수 있다.
	const int32 ApplyCount = FMath::Min3(
		JointActions.Num(),
		ActiveJointConfigs->Num(),
		ResolvedConstraints.Num()
	);

	for (int32 Index = 0; Index < ApplyCount; ++Index)
	{
		FConstraintInstance* Constraint = ResolvedConstraints[Index];

		if (Constraint == nullptr)
		{
			continue;
		}

		const FSpiderJointMotorConfig& Config = (*ActiveJointConfigs)[Index];

		// Learning Agents의 Continuous Action은 정규화된 제어값으로 사용할 것이다.
		// 따라서 여기서는 안전하게 -1.0 ~ +1.0 범위로 제한한다.
		//
		// Clamp를 하는 이유:
		// 학습 초기에는 랜덤 정책이 예상보다 큰 값을 만들 수 있다.
		// 이 값을 그대로 각도에 곱하면 관절이 과도하게 꺾이거나 물리 폭주가 날 수 있다.
		const float ActionValue = FMath::Clamp(JointActions[Index], -1.0f, 1.0f);

		// ActionValue 하나를 관절 하나의 목표 회전 변화량으로 변환한다.
		//
		// BaseTargetOrientation:
		//   Action이 0일 때의 기준 자세
		//
		// ActionScale:
		//   Action -1~+1을 Pitch/Yaw/Roll 각도 변화로 바꾸는 스케일
		//
		// 예:
		//   BaseTargetOrientation = (0, 0, 0)
		//   ActionScale.Pitch = 30
		//   ActionValue = 1
		//   → Pitch +30도 목표
		FRotator TargetOrientation = Config.BaseTargetOrientation;
		TargetOrientation.Pitch += Config.ActionScale.Pitch * ActionValue;
		TargetOrientation.Yaw += Config.ActionScale.Yaw * ActionValue;
		TargetOrientation.Roll += Config.ActionScale.Roll * ActionValue;

		Constraint->SetAngularOrientationTarget(
			TargetOrientation.Quaternion()
		);
	}
}

int32 USpiderJointControllerComponent::GetControlledJointCount() const
{
	const TArray<FSpiderJointMotorConfig>* ActiveJointConfigs = GetActiveJointConfigs();

	if (ActiveJointConfigs == nullptr)
	{
		return 0;
	}

	return ActiveJointConfigs->Num();
}
수정된 전체 흐름#
DA_SpiderJointConfig
└─ JointConfigs[24]
   ├─ BackLeg1_L
   ├─ BackLeg2_L
   ├─ ...
   └─ MiddleLeg4_R

BP_SpiderRobot
└─ SpiderJointController
   └─ JointConfigData = DA_SpiderJointConfig

BeginPlay
→ SpiderJointController.InitializeControlledConstraints()
→ DA_SpiderJointConfig에서 24개 이름 읽기
→ SpiderMesh Physics Asset에서 24개 Constraint 찾기
→ ResolvedConstraints에 저장

학습 중
→ BP_SpiderInteractor.Perform Agent Action
→ 24개 Action 추출
→ SpiderJointController.ApplyJointActions(Action[24])
→ 각 Constraint 목표 회전 변경
2.2.10. DA_SpiderJointConfig 생성 및 BP_SpiderRobot 연결#
1. Data Asset 만들기#
Data Asset이란? → 코드 로직은 없고, 설정 데이터만 저장하는 에셋파일
컨텐츠 브라우저에 폴더 생성
Content/Robots/Config우클릭 → Miscellaneous → Data Asset(기타→데이터 에셋)
데이터 에셋 종류 선택(우리가 이미 만들어둔 데이터) 및 이름 설정(DA_SpiderJointConfig)
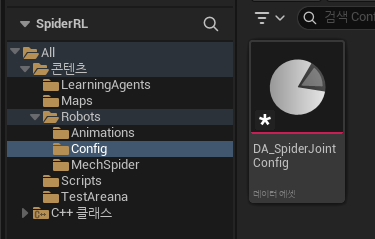
이 세셋이 앞으로 24개의 관절 이름과 관절별 제어 설정을 보관하는 설정 파일 역할을 하게 된다
2. DA_SpiderJointConfig 수정#
- 생성한 데이터 에셋(DA_SpiderJointConfig) 더블 클릭을 하면 안에 이미 생성해둔 Joint Config 배열이 보인다. 여기서 배열 크기를 관절의 개수와 같은 24개로 설정하고 관절의 순서대로 배열에 관절이름을 채워넣고 저장
참고
0  BackLeg1_L
1  BackLeg2_L
2  BackLeg3_L
3  BackLeg4_L

4  BackLeg1_R
5  BackLeg2_R
6  BackLeg3_R
7  BackLeg4_R

8  FrontLeg1_L
9  FrontLeg2_L
10 FrontLeg3_L
11 FrontLeg4_L

12 FrontLeg1_R
13 FrontLeg2_R
14 FrontLeg3_R
15 FrontLeg4_R

16 MiddleLeg1_L
17 MiddleLeg2_L
18 MiddleLeg3_L
19 MiddleLeg4_L

20 MiddleLeg1_R
21 MiddleLeg2_R
22 MiddleLeg3_R
23 MiddleLeg4_R
4. BP_SpiderRobot에 Data Asset 연결#
이제
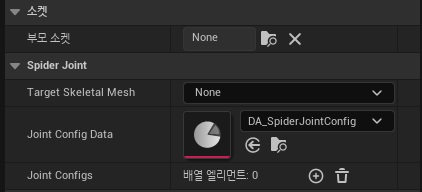
BP_SpiderRobot을 열어서 왼쪽 컴포넌트에서 SpiderJointController 선택오른쪽 Details 패널에서 새로 생긴 항목 Joint Config Data 를 찾아서, 거기에 방금 만든 데이터 에셋(DA_SpiderJointConfig)을 지정
5. 실행 후 로그 확인#
- 컴파일 → 저장 후 맵 화면에서 플레이 누른 후 로그를 확인해보자
출력 로그
LogSlate: Updating window title bar state: overlay mode, drag disabled, window buttons hidden, title bar hidden
LogWorld: BeginTearingDown for /Game/Maps/UEDPIE_0_TestArena
LogWorld: UWorld::CleanupWorld for TestArena, bSessionEnded=true, bCleanupResources=true
LogSlate: InvalidateAllWidgets triggered.  All widgets were invalidated
LogWorldPartition: UWorldPartition::Uninitialize : World = /Game/Maps/UEDPIE_0_TestArena.TestArena
LogPlayLevel: Display: Shutting down PIE online subsystems
LogSlate: InvalidateAllWidgets triggered.  All widgets were invalidated
LogSlate: Updating window title bar state: overlay mode, drag disabled, window buttons hidden, title bar hidden
LogAudioMixer: Deinitializing Audio Bus Subsystem for audio device with ID 5
LogAudioMixer: Display: FMixerPlatformXAudio2::StopAudioStream() called. InstanceID=5, StreamState=4
LogAudioMixer: Display: FMixerPlatformXAudio2::StopAudioStream() called. InstanceID=5, StreamState=2
LogUObjectHash: Compacting FUObjectHashTables data took   0.69ms
LogPlayLevel: Display: Destroying online subsystem :Context_9
LogDebuggerCommands: Repeating last play command: 선택된 뷰포트
LogContentBundle: [TestArena(에디터)] Generating Streaming for 0 Content Bundles.
LogWorldPartition: Display: GenerateStreaming for 'TestArena' started...
LogWorldPartition: Display: GenerateStreaming for 'TestArena' took 1.358 ms (total: 8.676 ms)
LogCameraSystemEditor: No camera objects needed building (inspected 0 objects)
LogPlayLevel: PlayLevel: No blueprints needed recompiling
LogPlayLevel: Creating play world package: /Game/Maps/UEDPIE_0_TestArena
LogWorldPartition: Display: UWorldPartition::PostDuplicatePIE started...
LogWorldPartition: Display: UWorldPartition::PostDuplicatePIE took 179 us (total: 900 us)
LogPlayLevel: PIE: StaticDuplicateObject took: (0.004253s)
LogPlayLevel: PIE: Created PIE world by copying editor world from /Game/Maps/TestArena.TestArena to /Game/Maps/UEDPIE_0_TestArena.TestArena (0.004281s)
LogUObjectHash: Compacting FUObjectHashTables data took   0.66ms
LogChaosDD: Creating Chaos Debug Draw Scene for world TestArena
LogWorldPartition: ULevel::OnLevelLoaded(TestArena)(bIsOwningWorldGameWorld=1, bIsOwningWorldPartitioned=1, InitializeForMainWorld=1, InitializeForEditor=0, InitializeForGame=1)
LogWorldPartition: Display: WorldPartition initialize started...
LogWorldPartition: UWorldPartition::Initialize : World = /Game/Maps/UEDPIE_0_TestArena.TestArena, World Type = PIE, IsMainWorldPartition = 1, Location = V(0), Rotation = R(0), IsEditor = 0, IsGame = 0, IsPIEWorldTravel = 0, IsCooking = 0
LogWorldPartition: UWorldPartition::Initialize Context : World NetMode = Standalone, IsServer = 0, IsDedicatedServer = 0, IsServerStreamingEnabled = 0, IsServerStreamingOutEnabled = 0, IsUsingMakingVisibleTransaction = 0, IsUsingMakingInvisibleTransaction = 0
LogWorldPartition: Display: WorldPartition initialize took 1.430 ms (total: 271.789 ms)
LogPlayLevel: PIE: World Init took: (0.002864s)
LogAudio: Display: Creating Audio Device:                 Id: 6, Scope: Unique, Realtime: True
LogAudioMixer: Display: Audio Mixer Platform Settings:
LogAudioMixer: Display:     Sample Rate:                          48000
LogAudioMixer: Display:     Callback Buffer Frame Size Requested: 1024
LogAudioMixer: Display:     Callback Buffer Frame Size To Use:    1024
LogAudioMixer: Display:     Number of buffers to queue:           1
LogAudioMixer: Display:     Max Channels (voices):                32
LogAudioMixer: Display:     Number of Async Source Workers:       4
LogAudio: Display: AudioDevice MaxSources: 32
LogAudio: Display: Audio Spatialization Plugin: None (built-in).
LogAudio: Display: Audio Reverb Plugin: None (built-in).
LogAudio: Display: Audio Occlusion Plugin: None (built-in).
LogAudioMixer: Display: Initializing audio mixer using platform API: 'XAudio2'
LogAudioEnumeration: Display: FWindowsMMDeviceCache: Default Render Role='Console', Device='스피커(High Definition Audio Device)'
LogAudioEnumeration: Display: FWindowsMMDeviceCache: Default Capture Role='Console', Device='마이크(2- ABKO EH550)'
LogAudioEnumeration: Display: FWindowsMMDeviceCache: Default Render Role='Multimedia', Device='스피커(High Definition Audio Device)'
LogAudioEnumeration: Display: FWindowsMMDeviceCache: Default Capture Role='Multimedia', Device='마이크(2- ABKO EH550)'
LogAudioEnumeration: Display: FWindowsMMDeviceCache: Default Render Role='Communications', Device='스피커(2- ABKO EH550)'
LogAudioEnumeration: Display: FWindowsMMDeviceCache: Default Capture Role='Communications', Device='마이크(2- ABKO EH550)'
LogAudioMixer: Display: Using Audio Hardware Device 스피커(High Definition Audio Device)
LogAudioMixer: Display: Initializing Sound Submixes...
LogAudioMixer: Display: Creating Master Submix 'MasterSubmixDefault'
LogAudioMixer: Display: Creating Master Submix 'MasterReverbSubmixDefault'
LogAudioMixer: FMixerPlatformXAudio2::StartAudioStream() called. InstanceID=6
LogAudioMixer: Display: Output buffers initialized: Frames=1024, Channels=2, Samples=2048, InstanceID=6
LogAudioMixer: Display: Starting AudioMixerPlatformInterface::RunInternal(), InstanceID=6
LogAudioMixer: Display: FMixerPlatformXAudio2::SubmitBuffer() called for the first time. InstanceID=6
LogInit: FAudioDevice initialized with ID 6.
LogAudio: Display: Audio Device (ID: 6) registered with world 'TestArena'.
LogAudioMixer: Initializing Audio Bus Subsystem for audio device with ID 6
LogLoad: Game class is 'GameModeBase'
LogWorld: Bringing World /Game/Maps/UEDPIE_0_TestArena.TestArena up for play (max tick rate 0) at 2026.05.24-15.59.50
LogWorld: Bringing up level for play took: 0.000385
LogOnline: OSS: Created online subsystem instance for: :Context_10
LogStreaming: Display: FlushAsyncLoading(896,895,894,893,892,891,890,889,888,887,886,885,884,883,882,881,880,879,878,877,876,875,874,873,872,871,870,869,868,867,866,865,864,863,862,861,860,859,858,857,854,855,856): 43 QueuedPackages, 0 AsyncPackages
LogTemp: [SpiderJointController] Joint[0] Constraint 'BackLeg1_L' 초기화 완료.
LogTemp: [SpiderJointController] Joint[1] Constraint 'BackLeg2_L' 초기화 완료.
LogTemp: [SpiderJointController] Joint[2] Constraint 'BackLeg3_L' 초기화 완료.
LogTemp: [SpiderJointController] Joint[3] Constraint 'BackLeg4_L' 초기화 완료.
LogTemp: [SpiderJointController] Joint[4] Constraint 'BackLeg1_R' 초기화 완료.
LogTemp: [SpiderJointController] Joint[5] Constraint 'BackLeg2_R' 초기화 완료.
LogTemp: [SpiderJointController] Joint[6] Constraint 'BackLeg3_R' 초기화 완료.
LogTemp: [SpiderJointController] Joint[7] Constraint 'BackLeg4_R' 초기화 완료.
LogTemp: [SpiderJointController] Joint[8] Constraint 'FrontLeg1_L' 초기화 완료.
LogTemp: [SpiderJointController] Joint[9] Constraint 'FrontLeg2_L' 초기화 완료.
LogTemp: [SpiderJointController] Joint[10] Constraint 'FrontLeg3_L' 초기화 완료.
LogTemp: [SpiderJointController] Joint[11] Constraint 'FrontLeg4_L' 초기화 완료.
LogTemp: [SpiderJointController] Joint[12] Constraint 'FrontLeg1_R' 초기화 완료.
LogTemp: [SpiderJointController] Joint[13] Constraint 'FrontLeg2_R' 초기화 완료.
LogTemp: [SpiderJointController] Joint[14] Constraint 'FrontLeg3_R' 초기화 완료.
LogTemp: [SpiderJointController] Joint[15] Constraint 'FrontLeg4_R' 초기화 완료.
LogTemp: [SpiderJointController] Joint[16] Constraint 'MiddleLeg1_L' 초기화 완료.
LogTemp: [SpiderJointController] Joint[17] Constraint 'MiddleLeg2_L' 초기화 완료.
LogTemp: [SpiderJointController] Joint[18] Constraint 'MiddleLeg3_L' 초기화 완료.
LogTemp: [SpiderJointController] Joint[19] Constraint 'MiddleLeg4_L' 초기화 완료.
LogTemp: [SpiderJointController] Joint[20] Constraint 'MiddleLeg1_R' 초기화 완료.
LogTemp: [SpiderJointController] Joint[21] Constraint 'MiddleLeg2_R' 초기화 완료.
LogTemp: [SpiderJointController] Joint[22] Constraint 'MiddleLeg3_R' 초기화 완료.
LogTemp: [SpiderJointController] Joint[23] Constraint 'MiddleLeg4_R' 초기화 완료.
LogTemp: [SpiderJointController] 제어 관절 초기화 완료. Configs=24, ResolvedConstraints=24, Source=DataAsset
LogLearning: Display: BP_SpiderLearningManager: Adding Agent BP_SpiderRobot_C_UAID_345A601B0C9B4FDD02_1194554775 with id 0.
PIE: 서버가 로그인했습니다.
PIE: 에디터에서 플레이 총 시작 시간 0.174초입니다.
LogRenderer: Recreating Persistent SBTs due to initializer changes:
        NumShaderSlotsPerGeometrySegment changed: current: 1 - new: 2
        NumGeometrySegments changed: current: 0 - new: 512
출력 로그를 보면 모든 24개의 Constraint 를 초기화 한 것을 확인할 수 있다
생성한 데이터 에셋도 정상적으로 읽고 있다
제어 관절 초기화 완료. Configs=24, ResolvedConstraints=24, Source=DataAsset즉
BP_SpiderTrainingManager가BP_SpiderRobot을 Learning Agents의 Agent로 등록하는 것도 정상 동작 중이야
2.2.11. [BP] Learning Agents Action[24]를 ApplyJointActions로 전달#
- 이제 다음 단계는 Interactor의
Perform Agent Action연결을 만들 차례다. - 즉, 지금까지는
- Learning Agents가 24개 Action을 출력한다는 구조 정의
- SpiderJointController가 24개 관절을 제어할 준비 완료
- 라면, 이제는
BP_SpiderInteractor의Perform Agent Action에서 학습기가 낸 24개 값을 꺼내서 C++ 함수에 넘겨야 한다.
1. BP_SpiderInteractor 들어가기#
BP_SpiderInteractor 더블 클릭 → Perform Agent Action
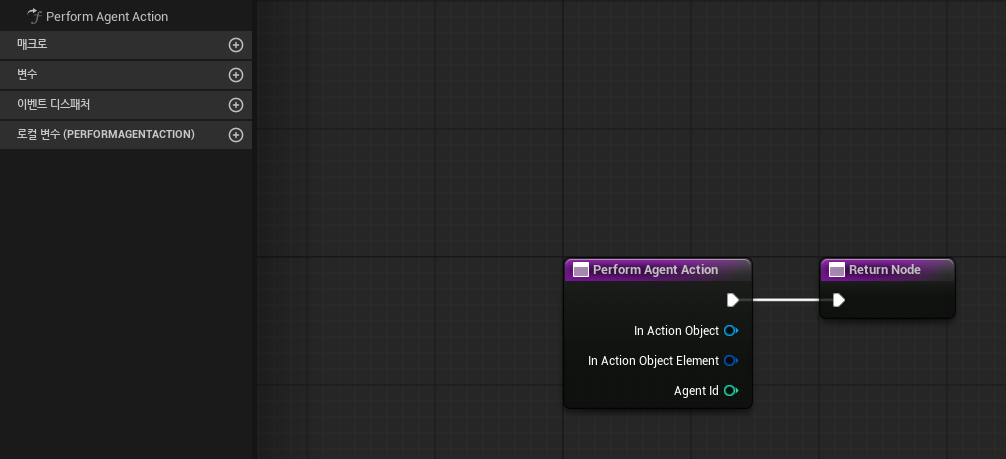
해당 노드를 보면 입력핀이 3개 있는 것을 확인할 수 있다
- In Action Object : 이번 스텝에서 만든 전체 Action 데이터 묶음
→ 우리가 정의한 24 개 관절의 Continuous Action이 이 안에 들어있다.
- In Action Object Element : 그 Action 묶음 안에서 어떤 Agent 항목을 읽을지 가리키는 핸들
- Agent Id : 현재 행동을 적용할 Agent의 ID
2. Agent Id로 실제 거미로봇 등록#
Agent Id 핀에서 드래그해서 노드 검색(Get Agent)
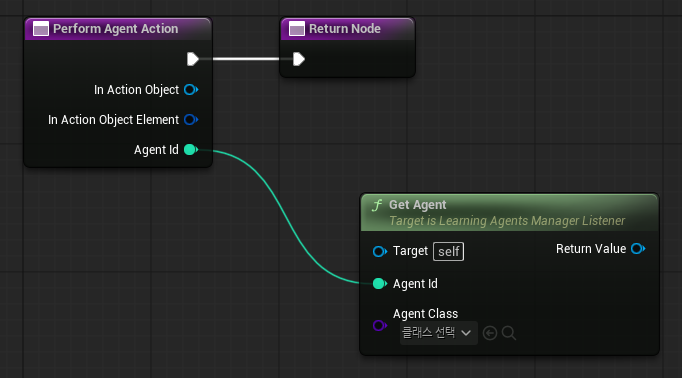
Get Agent 노드의
- 클래스 선택 → BP_SpiderRobot
- Return Value → Spider Joint Controller
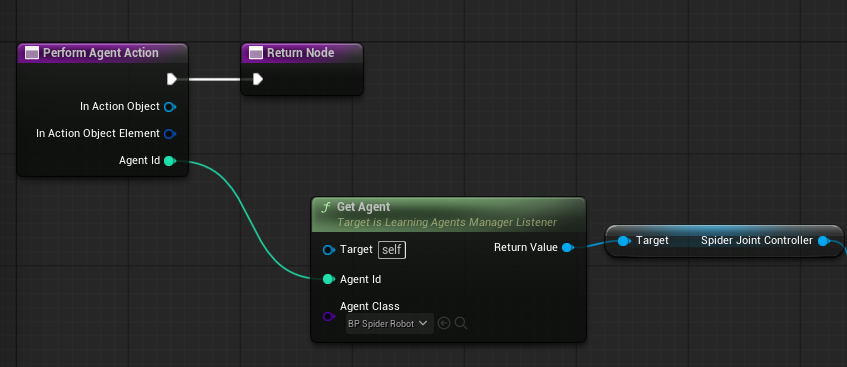
왜 이걸 하지?#
우리가 C++에 만든 실제 관절 제어 함수는
piderJointControllerComponent안에 있음ApplyJointActions(constTArray<float>&JointActions)그래서 Learning Agents Action 값을 최종적으로 여기에 넘기려면, 먼저 로봇에서 이 컴포넌트를 꺼내야 함
Agent Id
→ Get Agent(BP_SpiderRobot)
→ Get SpiderJointController
→ ApplyJointActions
3. 관절 제어 컴포넌트에 Action 적용 노드 연결#
Spider Joint Controller핀에서Apply Joint Actions노드(우리가 C++에 만들었던 함수) 뽑기UFUNCTION(BlueprintCallable, Category = "Spider Joint") void ApplyJointActions(const TArray<float>& JointActions);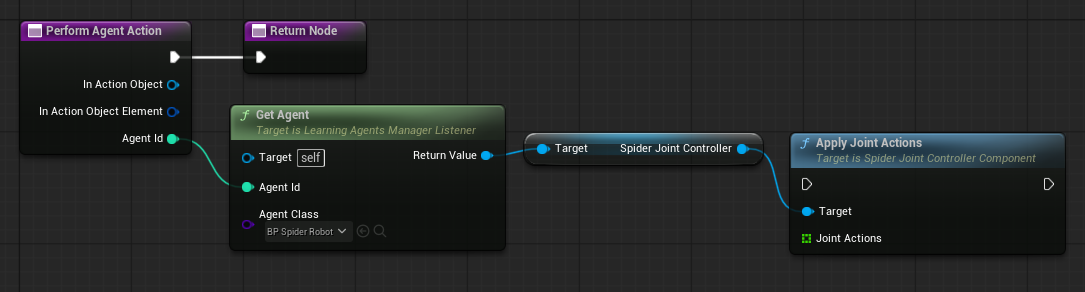
왜 이걸 하지?#
이 노드가 하는 일
이 함수는 우리가 C++에서 만든 관절 제어 함수이며, Learning Agents가 출력한 Action 배열을 실제 Physics Constraint 목표 회전값으로 변환하는 역할을 수행
Perform Agent Action함수는 Learning Agents가 매 스텝마다 “이번 Agent에게 이 Action을 적용하라”고 호출하는 함수다.그런데 지금까지는 함수가 호출되어도 바로
Return Node로 넘어가기 때문에 실제 로봇에는 아무 행동도 적용되지 않는다.기존 흐름: Perform Agent Action → Return Node → 아무 관절도 움직이지 않음따라서 중간에
Apply Joint Actions를 실행시켜야 한다.수정 후 흐름: Perform Agent Action → Apply Joint Actions → 24개 Action을 24개 관절 목표 회전으로 적용 → Return Node즉, 이 단계는 Learning Agents의 출력값을 실제 거미 로봇 관절 움직임으로 연결하는 핵심 단계
현재 Perform Agent Action 함수가 호출될 때마다 실제로 관절에 Action을 적용해야 하는데 바로 Return Node로 가면 아무 일도 안하고 끝나버린다. 그렇기 때문에 중간에 ApplyJointAction을 실행시켜야 한다.
4. Continuous Action 값 꺼내기#
이제 실제로 넘겨받을 24개의 Action 배열을 등록해주조자
Perform Agent Action의 In Action Object 드래그 → Get Continuous Action 노드 생성
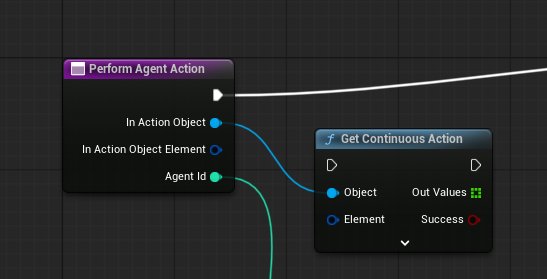
Perform Agent 출력 핀 연결
In Action Object
→ Get Continuous Action.Object

In Action Object Element
→ Get Continuous Action.Element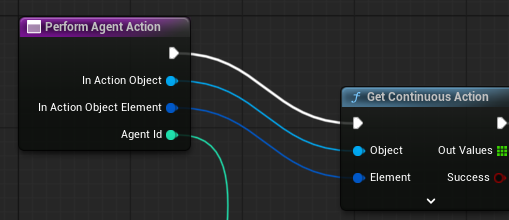
실행 흐름도
Get Continuous Action을 거치도록 수정Perform Agent Action → Get Continuous Action → Apply Joint Actions → Return Node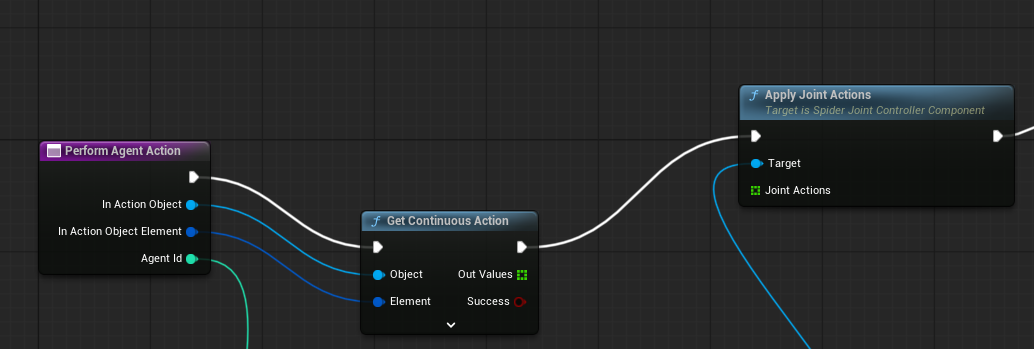
왜 이걸 하지?#
Specify Agent Action에서 우리는 이미 아래와 같이 Action 구조를 정의했음Continuous Action Size = 24즉, Learning Agents는 매 스텝마다 24개의 float 값을 출력한다.
하지만
Perform Agent Action함수 안으로 들어오는 값은 처음부터 float 배열 형태로 바로 들어오는 것이 아니라,In Action Object와In Action Object Element라는 형태로 전달된다.In Action Object = 이번 스텝에 생성된 전체 Action 데이터 묶음 In Action Object Element = 그 Action 데이터 안에서 우리가 정의한 Continuous Action 항목따라서 실제 24개 float 배열을 사용하려면
Get Continuous Action노드를 통해 값을 꺼내야 한다.In Action Object + In Action Object Element → Get Continuous Action → Out Values여기서
Out Values가 바로 Learning Agents가 출력한 24개의 Action 배열이다.Out Values[0] → BackLeg1_L Out Values[1] → BackLeg2_L Out Values[2] → BackLeg3_L ... Out Values[23] → MiddleLeg4_R이 배열을
Apply Joint Actions의Joint Actions입력에 연결하면, C++의ApplyJointActions함수가 각 값을 읽어서 24개 Physics Constraint의 목표 회전값으로 변환한다.Learning Agents Action[24] → Get Continuous Action.Out Values → ApplyJointActions(JointActions) → SpiderJointControllerComponent → 24개 Constraint 목표 회전 갱신즉, 이 단계는 Learning Agents 내부의 Action 데이터를 실제 C++ 관절 제어 함수가 사용할 수 있는 float 배열로 꺼내는 단계
최종 형태
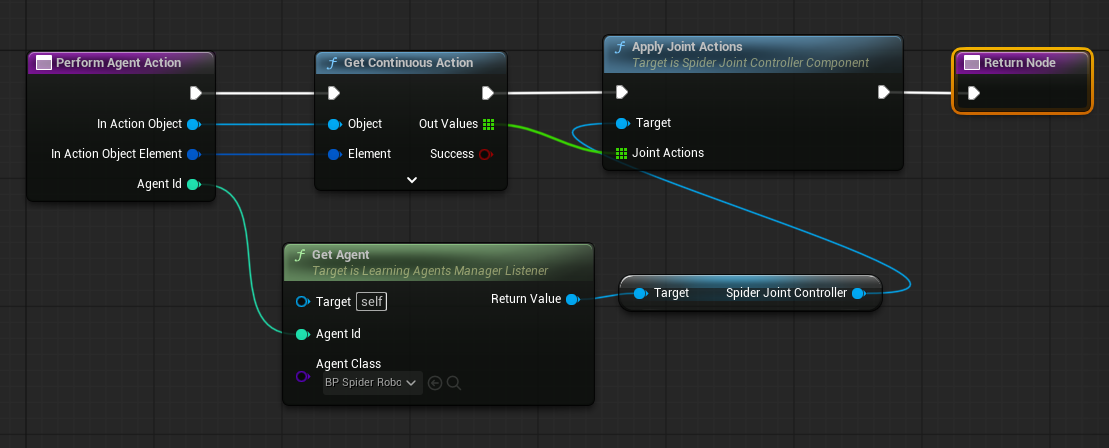
컴파일 저장 후, 플레이
출력 로그 확인
LogSlate: Updating window title bar state: overlay mode, drag disabled, window buttons hidden, title bar hidden
LogWorld: BeginTearingDown for /Game/Maps/UEDPIE_0_TestArena
LogWorld: UWorld::CleanupWorld for TestArena, bSessionEnded=true, bCleanupResources=true
LogSlate: InvalidateAllWidgets triggered.  All widgets were invalidated
LogWorldPartition: UWorldPartition::Uninitialize : World = /Game/Maps/UEDPIE_0_TestArena.TestArena
LogPlayLevel: Display: Shutting down PIE online subsystems
LogSlate: InvalidateAllWidgets triggered.  All widgets were invalidated
LogSlate: Updating window title bar state: overlay mode, drag disabled, window buttons hidden, title bar hidden
LogAudioMixer: Deinitializing Audio Bus Subsystem for audio device with ID 7
LogAudioMixer: Display: FMixerPlatformXAudio2::StopAudioStream() called. InstanceID=7, StreamState=4
LogAudioMixer: Display: FMixerPlatformXAudio2::StopAudioStream() called. InstanceID=7, StreamState=2
LogUObjectHash: Compacting FUObjectHashTables data took   0.70ms
LogPlayLevel: Display: Destroying online subsystem :Context_15
LogDebuggerCommands: Repeating last play command: 선택된 뷰포트
LogContentBundle: [TestArena(에디터)] Generating Streaming for 0 Content Bundles.
LogWorldPartition: Display: GenerateStreaming for 'TestArena' started...
LogWorldPartition: Display: GenerateStreaming for 'TestArena' took 1.370 ms (total: 11.501 ms)
LogCameraSystemEditor: No camera objects needed building (inspected 0 objects)
LogPlayLevel: PlayLevel: No blueprints needed recompiling
LogPlayLevel: Creating play world package: /Game/Maps/UEDPIE_0_TestArena
LogWorldPartition: Display: UWorldPartition::PostDuplicatePIE started...
LogWorldPartition: Display: UWorldPartition::PostDuplicatePIE took 184 us (total: 1.262 ms)
LogPlayLevel: PIE: StaticDuplicateObject took: (0.004292s)
LogPlayLevel: PIE: Created PIE world by copying editor world from /Game/Maps/TestArena.TestArena to /Game/Maps/UEDPIE_0_TestArena.TestArena (0.004325s)
LogUObjectHash: Compacting FUObjectHashTables data took   0.67ms
LogChaosDD: Creating Chaos Debug Draw Scene for world TestArena
LogWorldPartition: ULevel::OnLevelLoaded(TestArena)(bIsOwningWorldGameWorld=1, bIsOwningWorldPartitioned=1, InitializeForMainWorld=1, InitializeForEditor=0, InitializeForGame=1)
LogWorldPartition: Display: WorldPartition initialize started...
LogWorldPartition: UWorldPartition::Initialize : World = /Game/Maps/UEDPIE_0_TestArena.TestArena, World Type = PIE, IsMainWorldPartition = 1, Location = V(0), Rotation = R(0), IsEditor = 0, IsGame = 0, IsPIEWorldTravel = 0, IsCooking = 0
LogWorldPartition: UWorldPartition::Initialize Context : World NetMode = Standalone, IsServer = 0, IsDedicatedServer = 0, IsServerStreamingEnabled = 0, IsServerStreamingOutEnabled = 0, IsUsingMakingVisibleTransaction = 0, IsUsingMakingInvisibleTransaction = 0
LogWorldPartition: Display: WorldPartition initialize took 1.358 ms (total: 274.527 ms)
LogPlayLevel: PIE: World Init took: (0.002779s)
LogAudio: Display: Creating Audio Device:                 Id: 8, Scope: Unique, Realtime: True
LogAudioMixer: Display: Audio Mixer Platform Settings:
LogAudioMixer: Display:     Sample Rate:                          48000
LogAudioMixer: Display:     Callback Buffer Frame Size Requested: 1024
LogAudioMixer: Display:     Callback Buffer Frame Size To Use:    1024
LogAudioMixer: Display:     Number of buffers to queue:           1
LogAudioMixer: Display:     Max Channels (voices):                32
LogAudioMixer: Display:     Number of Async Source Workers:       4
LogAudio: Display: AudioDevice MaxSources: 32
LogAudio: Display: Audio Spatialization Plugin: None (built-in).
LogAudio: Display: Audio Reverb Plugin: None (built-in).
LogAudio: Display: Audio Occlusion Plugin: None (built-in).
LogAudioMixer: Display: Initializing audio mixer using platform API: 'XAudio2'
LogAudioEnumeration: Display: FWindowsMMDeviceCache: Default Render Role='Console', Device='스피커(High Definition Audio Device)'
LogAudioEnumeration: Display: FWindowsMMDeviceCache: Default Capture Role='Console', Device='마이크(2- ABKO EH550)'
LogAudioEnumeration: Display: FWindowsMMDeviceCache: Default Render Role='Multimedia', Device='스피커(High Definition Audio Device)'
LogAudioEnumeration: Display: FWindowsMMDeviceCache: Default Capture Role='Multimedia', Device='마이크(2- ABKO EH550)'
LogAudioEnumeration: Display: FWindowsMMDeviceCache: Default Render Role='Communications', Device='스피커(2- ABKO EH550)'
LogAudioEnumeration: Display: FWindowsMMDeviceCache: Default Capture Role='Communications', Device='마이크(2- ABKO EH550)'
LogAudioMixer: Display: Using Audio Hardware Device 스피커(High Definition Audio Device)
LogAudioMixer: Display: Initializing Sound Submixes...
LogAudioMixer: Display: Creating Master Submix 'MasterSubmixDefault'
LogAudioMixer: Display: Creating Master Submix 'MasterReverbSubmixDefault'
LogAudioMixer: FMixerPlatformXAudio2::StartAudioStream() called. InstanceID=8
LogAudioMixer: Display: Output buffers initialized: Frames=1024, Channels=2, Samples=2048, InstanceID=8
LogAudioMixer: Display: Starting AudioMixerPlatformInterface::RunInternal(), InstanceID=8
LogAudioMixer: Display: FMixerPlatformXAudio2::SubmitBuffer() called for the first time. InstanceID=8
LogInit: FAudioDevice initialized with ID 8.
LogAudio: Display: Audio Device (ID: 8) registered with world 'TestArena'.
LogAudioMixer: Initializing Audio Bus Subsystem for audio device with ID 8
LogLoad: Game class is 'GameModeBase'
LogWorld: Bringing World /Game/Maps/UEDPIE_0_TestArena.TestArena up for play (max tick rate 0) at 2026.05.24-17.07.11
LogWorld: Bringing up level for play took: 0.000510
LogOnline: OSS: Created online subsystem instance for: :Context_16
LogStreaming: Display: FlushAsyncLoading(983,982,981,980,979,978,977,976,975,974,973,972,971,970,969,968,967,966,965,964,963,962,961,960,959,958,957,956,955,954,953,952,951,950,949,948,947,946,945,944,941,942,943): 43 QueuedPackages, 0 AsyncPackages
LogTemp: [SpiderJointController] Joint[0] Constraint 'BackLeg1_L' 초기화 완료.
LogTemp: [SpiderJointController] Joint[1] Constraint 'BackLeg2_L' 초기화 완료.
LogTemp: [SpiderJointController] Joint[2] Constraint 'BackLeg3_L' 초기화 완료.
LogTemp: [SpiderJointController] Joint[3] Constraint 'BackLeg4_L' 초기화 완료.
LogTemp: [SpiderJointController] Joint[4] Constraint 'BackLeg1_R' 초기화 완료.
LogTemp: [SpiderJointController] Joint[5] Constraint 'BackLeg2_R' 초기화 완료.
LogTemp: [SpiderJointController] Joint[6] Constraint 'BackLeg3_R' 초기화 완료.
LogTemp: [SpiderJointController] Joint[7] Constraint 'BackLeg4_R' 초기화 완료.
LogTemp: [SpiderJointController] Joint[8] Constraint 'FrontLeg1_L' 초기화 완료.
LogTemp: [SpiderJointController] Joint[9] Constraint 'FrontLeg2_L' 초기화 완료.
LogTemp: [SpiderJointController] Joint[10] Constraint 'FrontLeg3_L' 초기화 완료.
LogTemp: [SpiderJointController] Joint[11] Constraint 'FrontLeg4_L' 초기화 완료.
LogTemp: [SpiderJointController] Joint[12] Constraint 'FrontLeg1_R' 초기화 완료.
LogTemp: [SpiderJointController] Joint[13] Constraint 'FrontLeg2_R' 초기화 완료.
LogTemp: [SpiderJointController] Joint[14] Constraint 'FrontLeg3_R' 초기화 완료.
LogTemp: [SpiderJointController] Joint[15] Constraint 'FrontLeg4_R' 초기화 완료.
LogTemp: [SpiderJointController] Joint[16] Constraint 'MiddleLeg1_L' 초기화 완료.
LogTemp: [SpiderJointController] Joint[17] Constraint 'MiddleLeg2_L' 초기화 완료.
LogTemp: [SpiderJointController] Joint[18] Constraint 'MiddleLeg3_L' 초기화 완료.
LogTemp: [SpiderJointController] Joint[19] Constraint 'MiddleLeg4_L' 초기화 완료.
LogTemp: [SpiderJointController] Joint[20] Constraint 'MiddleLeg1_R' 초기화 완료.
LogTemp: [SpiderJointController] Joint[21] Constraint 'MiddleLeg2_R' 초기화 완료.
LogTemp: [SpiderJointController] Joint[22] Constraint 'MiddleLeg3_R' 초기화 완료.
LogTemp: [SpiderJointController] Joint[23] Constraint 'MiddleLeg4_R' 초기화 완료.
LogTemp: [SpiderJointController] 제어 관절 초기화 완료. Configs=24, ResolvedConstraints=24, Source=DataAsset
LogLearning: Display: BP_SpiderLearningManager: Adding Agent BP_SpiderRobot_C_UAID_345A601B0C9B4FDD02_1194554775 with id 0.
PIE: 서버가 로그인했습니다.
PIE: 에디터에서 플레이 총 시작 시간 0.195초입니다.
LogRenderer: Recreating Persistent SBTs due to initializer changes:
        NumShaderSlotsPerGeometrySegment changed: current: 1 - new: 2
        NumGeometrySegments changed: current: 0 - new: 512
3. 후기#
정말이지, 그냥 영상으로 보는 것과 그걸 실제로 구현해내는 것은 정말 완벽하게 다르다는 걸 새삼 느끼게 된다.